> ## Documentation Index
> Fetch the complete documentation index at: https://docs.qobra.co/llms.txt
> Use this file to discover all available pages before exploring further.
# SSO
## Introduction
Single sign-on (SSO) is an authentication method that enables users to securely
authenticate with multiple applications and websites by using just one set of
credentials. Qobra’s SSO is implemented based on SAML (open standard used for
authentication).
This feature is pen-tested yearly by independent contractors.
There are 3 parties involved in a SSO connection on Qobra:
* The user who wishes to connect with his email address
* Qobra, the application where the user wants to authenticate
* The identity provider (IDP) which authenticates users and grand them access
to the platform, such as `Okta`, `AzureDirectory`, `Keycloak`, etc …
## Setup
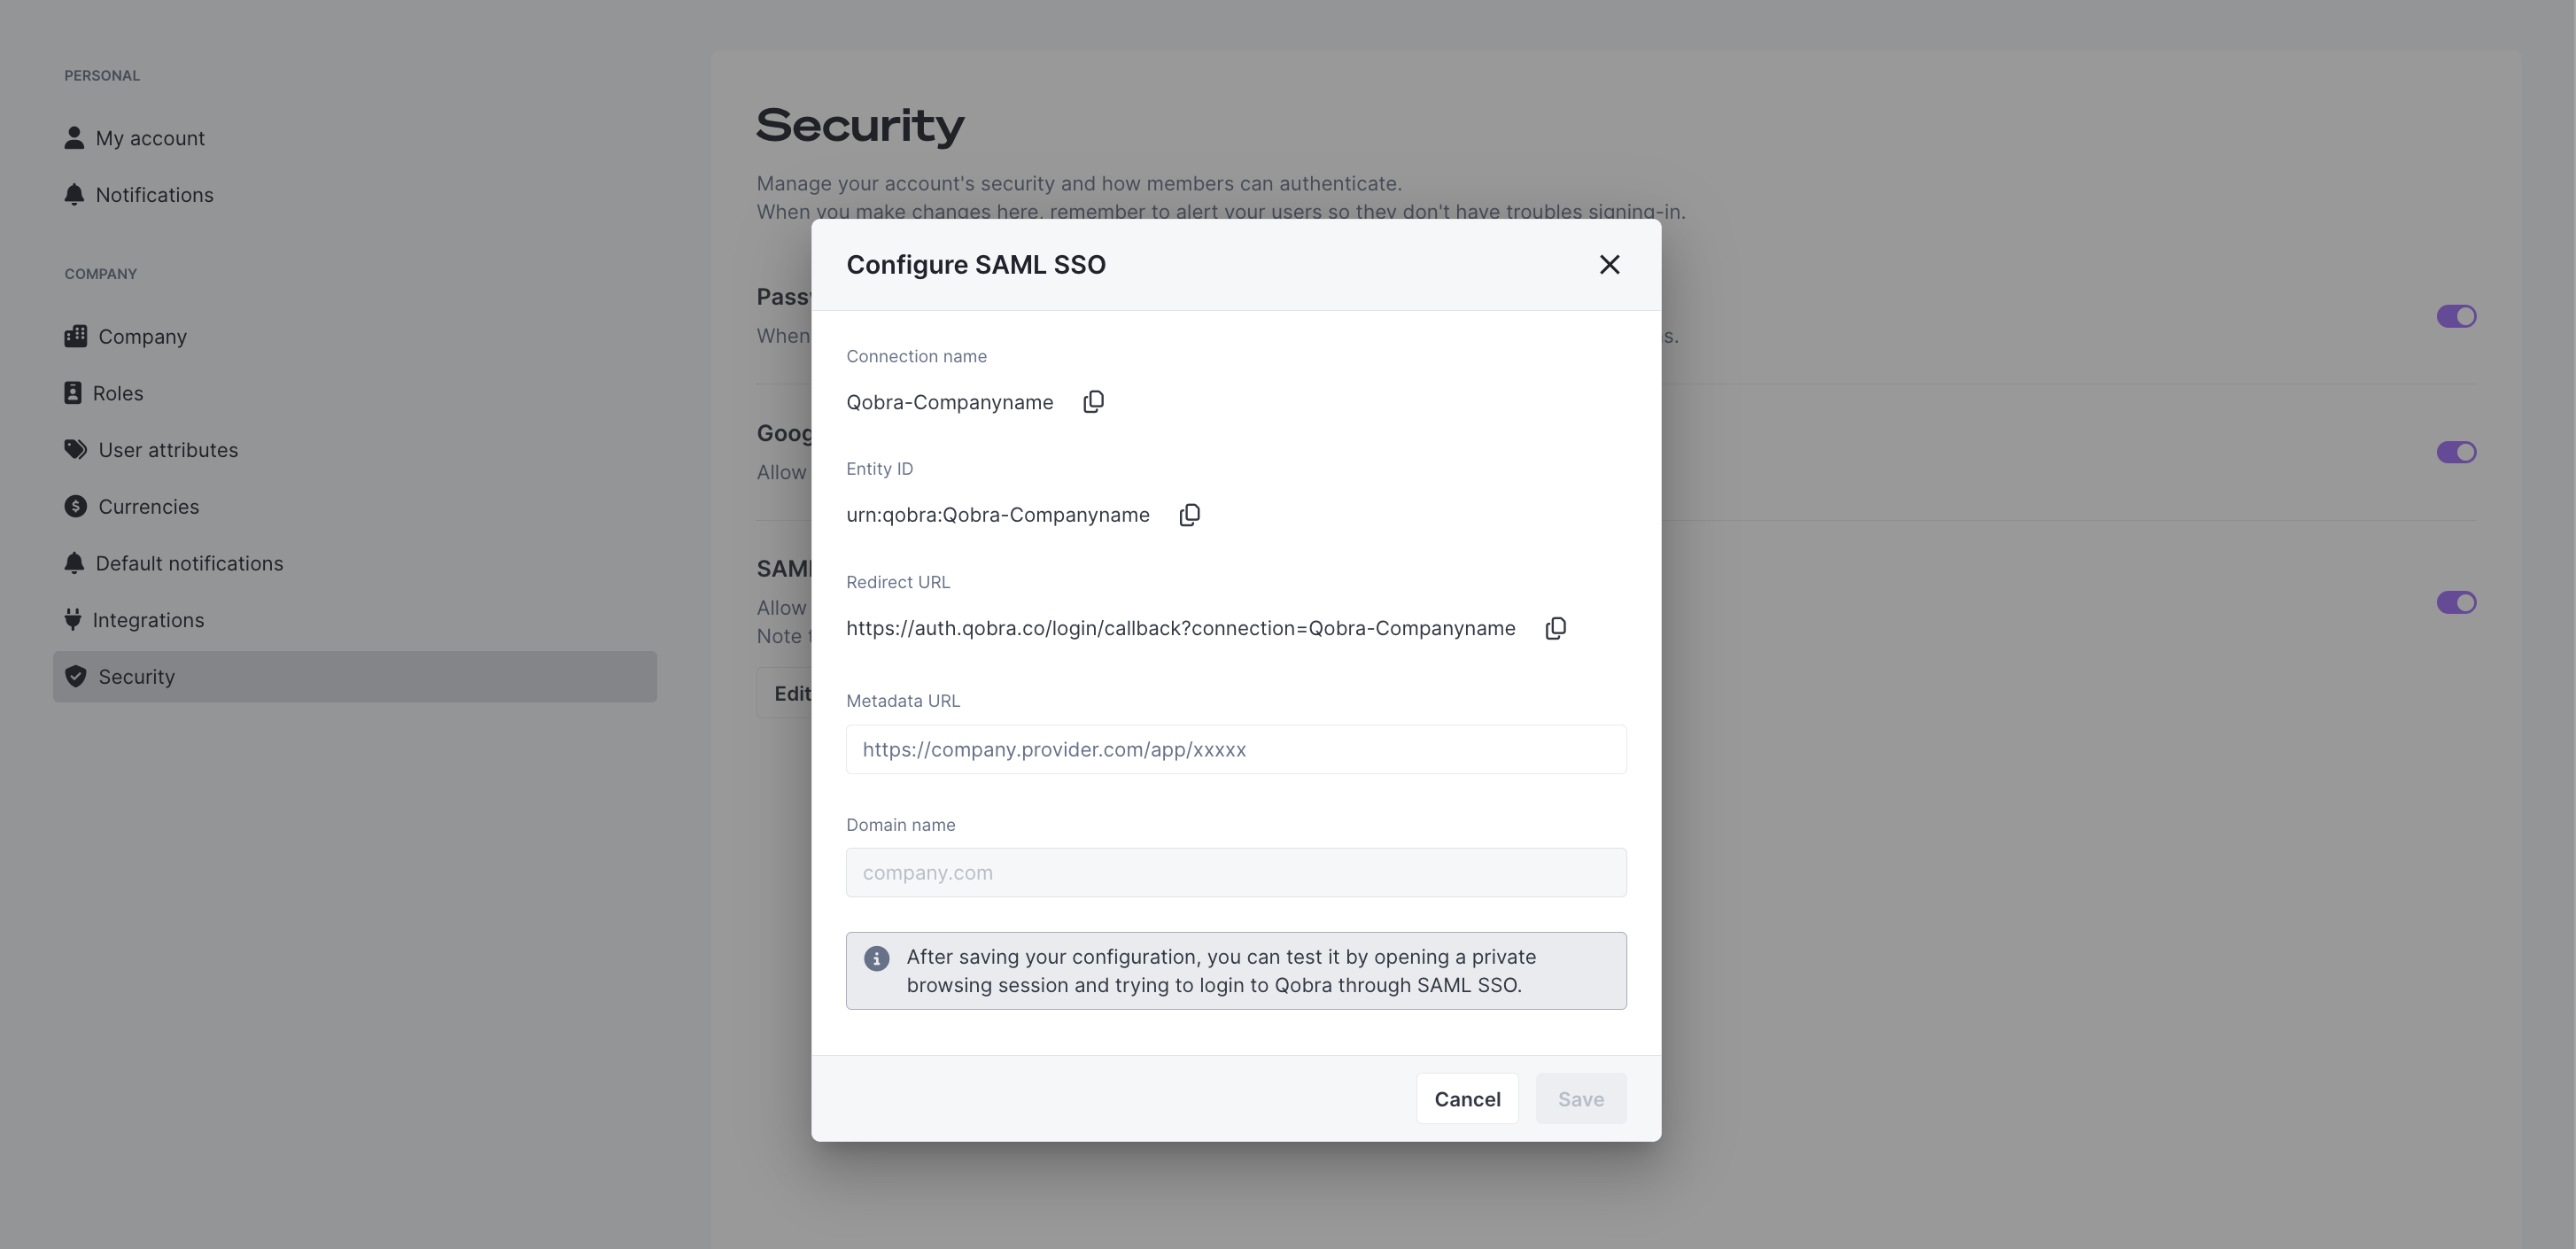
You can manually setup your SSO in the Qobra platform (company settings -
security).
 ### Step 1: Retrieve data from Qobra
You’ll have first to retrieve the following information fields below, and
input it in your IDP:
* `Entity ID`: unique identifier that is used to identify a specific
entity (here your Qobra account) in the SAML authentication.
* `Redirect URL` or `Callback URL`: The callback URL represents the place
where people will be redirected to after authenticating with their identity
provider.
### Step 2: Input data in Qobra
Then, you’ll have to fill in both field below to complete SAML setup:
* `Domain name`: domain name used in the company's user email addresses.
This field will default to your email’s domain name.
* `Metadata URL`: URL of the SAML metadata, an XML document which
contains information necessary for interaction with Identity Provider(IDP).
This document contains essentials data to make the connection secure and
successful (ex: URLs of endpoints, information about supported bindings,
identifiers and public keys).
The metadata available at the metadata URL should look something like this:
```xml theme={null}
MIID7T...T7yNJg==
MIID7TCC......QsT7yNJg==
urn:oasis:names:tc:SAML:2.0:nameid-format:transient
Administrator
name@emailprovider.com
```
### Step 3: Multiple domain names (optional)
If your company currently has more then one domain name (because of a merger
or rebranding typically), you can [contact the support](mailto:support@qobra.co)
for them to fill in a second domain name for your company. You can’t do this
action on your own for security purposes.
## Identity provider tutorials
You'll find here step by step tutorials for our customers top 3 identity providers.
If you'd like another identity provider to be present here, just ask us [here](mailto:tanguy@qobra.co).
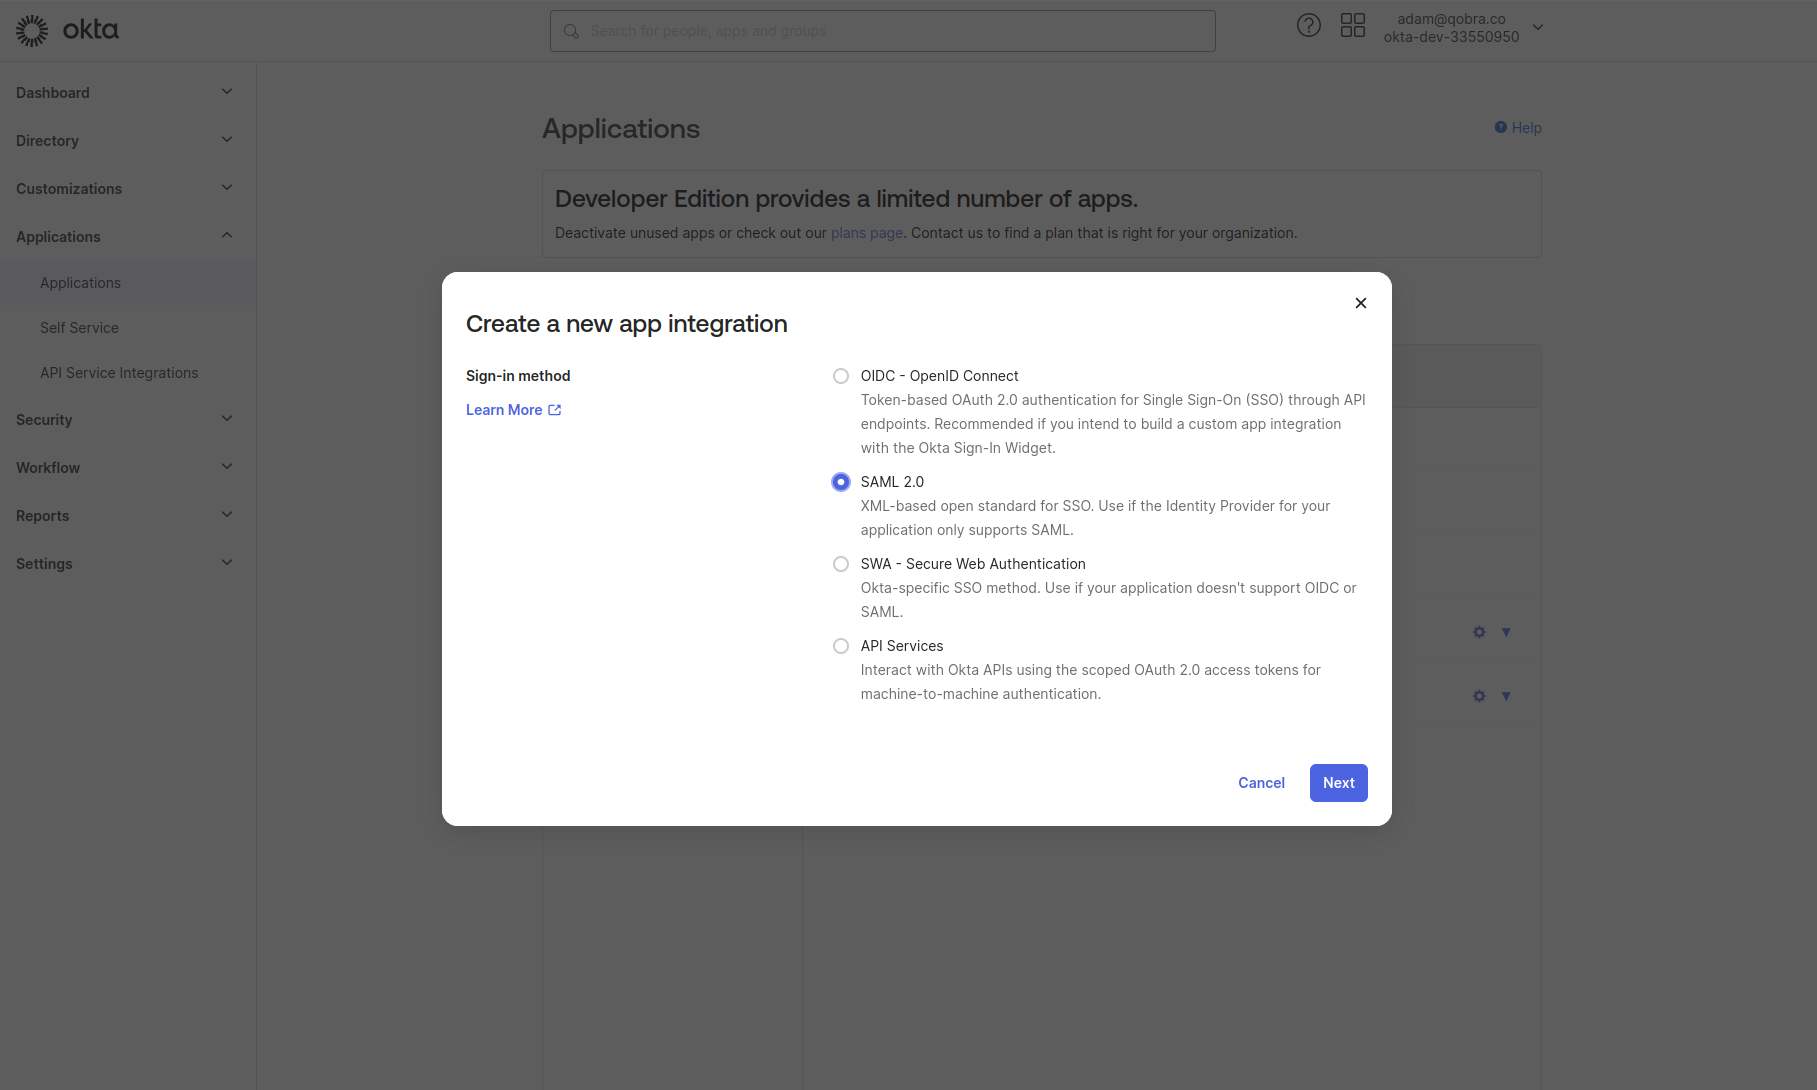
1. Go to your admin dashboard, in the Applications tab.
2. Click on the button **“Create a new app integration”** and select SAML 2.0
### Step 1: Retrieve data from Qobra
You’ll have first to retrieve the following information fields below, and
input it in your IDP:
* `Entity ID`: unique identifier that is used to identify a specific
entity (here your Qobra account) in the SAML authentication.
* `Redirect URL` or `Callback URL`: The callback URL represents the place
where people will be redirected to after authenticating with their identity
provider.
### Step 2: Input data in Qobra
Then, you’ll have to fill in both field below to complete SAML setup:
* `Domain name`: domain name used in the company's user email addresses.
This field will default to your email’s domain name.
* `Metadata URL`: URL of the SAML metadata, an XML document which
contains information necessary for interaction with Identity Provider(IDP).
This document contains essentials data to make the connection secure and
successful (ex: URLs of endpoints, information about supported bindings,
identifiers and public keys).
The metadata available at the metadata URL should look something like this:
```xml theme={null}
MIID7T...T7yNJg==
MIID7TCC......QsT7yNJg==
urn:oasis:names:tc:SAML:2.0:nameid-format:transient
Administrator
name@emailprovider.com
```
### Step 3: Multiple domain names (optional)
If your company currently has more then one domain name (because of a merger
or rebranding typically), you can [contact the support](mailto:support@qobra.co)
for them to fill in a second domain name for your company. You can’t do this
action on your own for security purposes.
## Identity provider tutorials
You'll find here step by step tutorials for our customers top 3 identity providers.
If you'd like another identity provider to be present here, just ask us [here](mailto:tanguy@qobra.co).
1. Go to your admin dashboard, in the Applications tab.
2. Click on the button **“Create a new app integration”** and select SAML 2.0
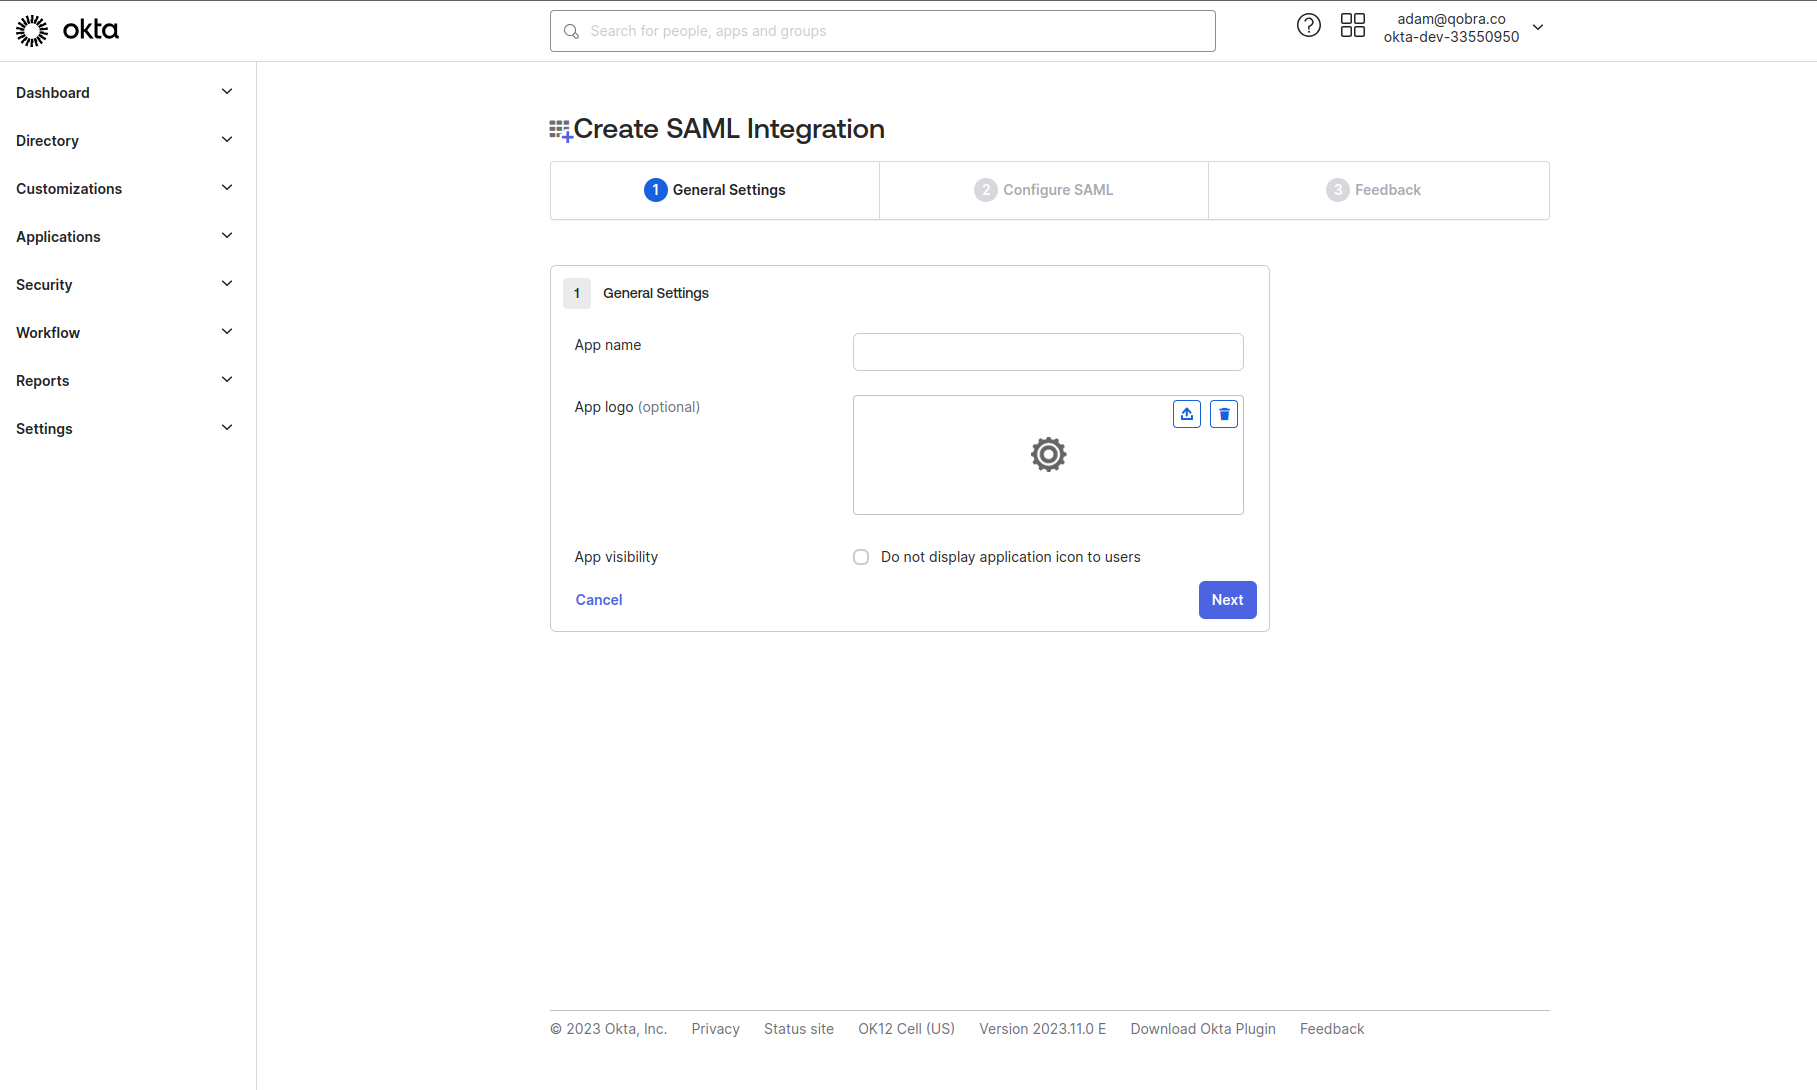
 3. Fill the basic info of the app (App name: Qobra, logo, etc.)
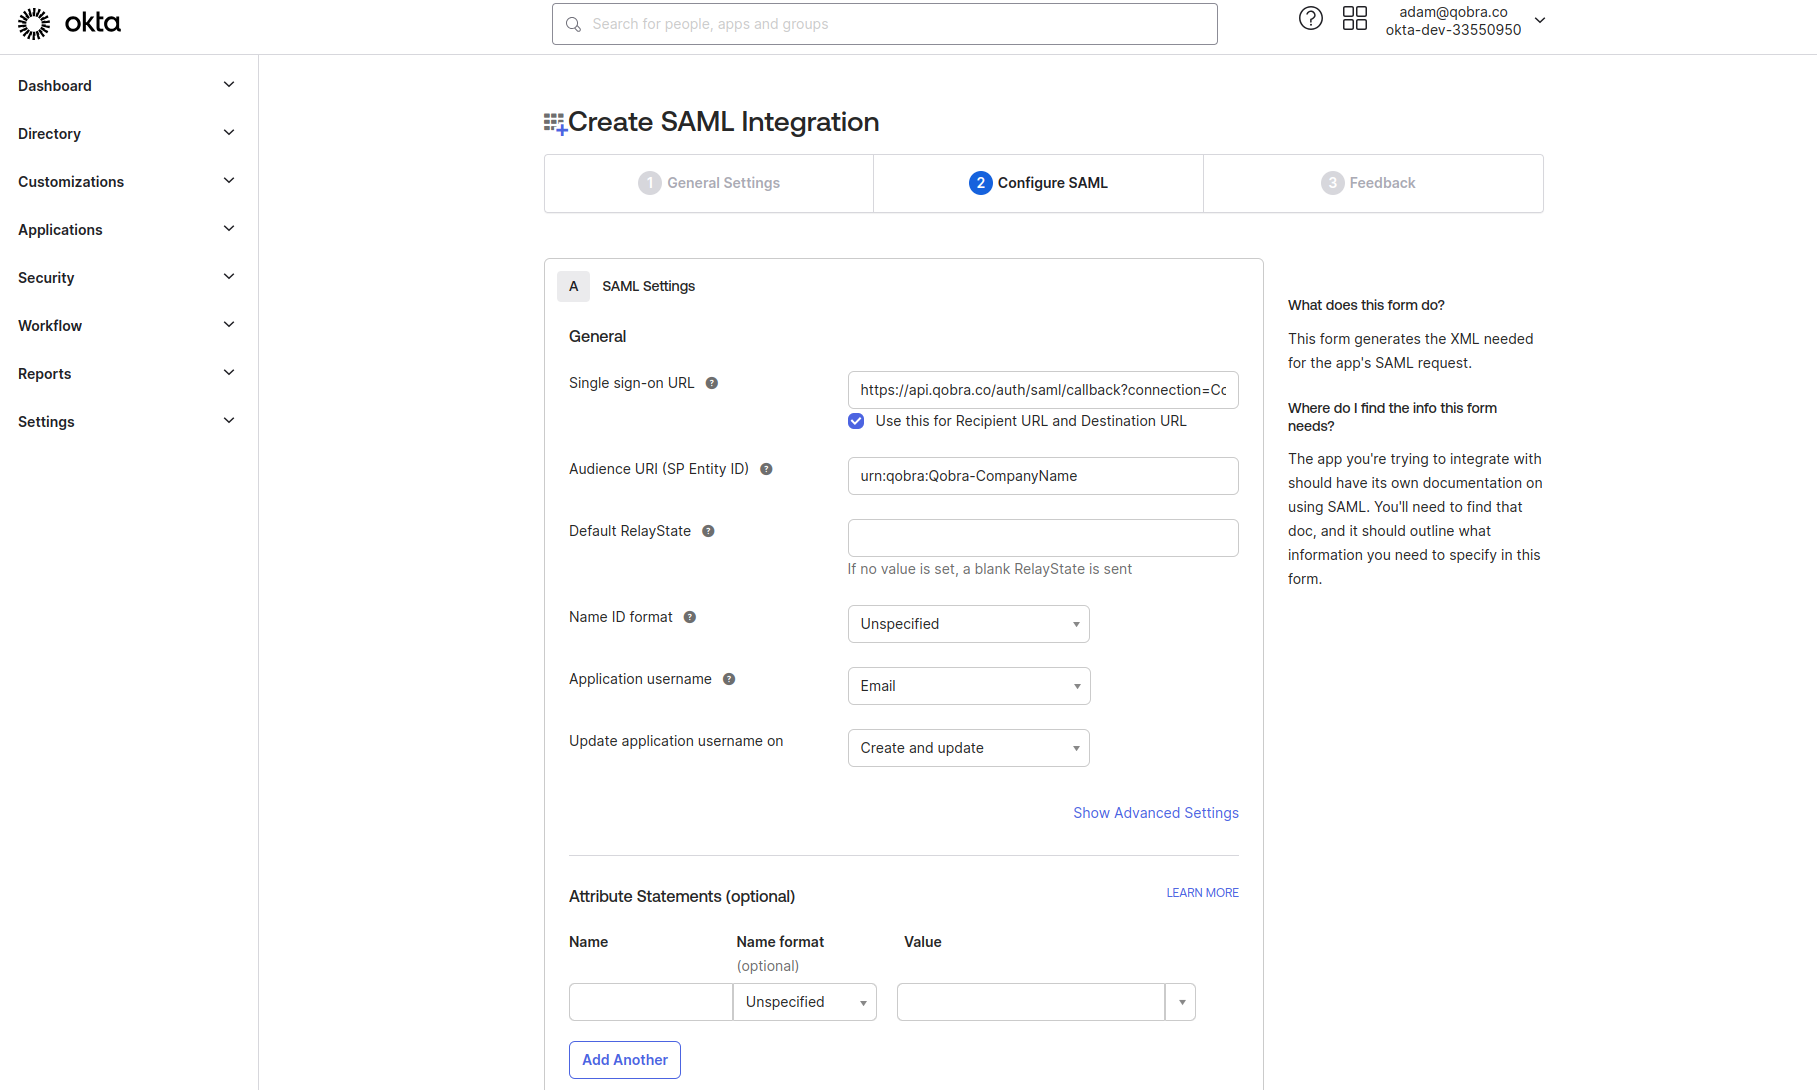
 4. Fill the SAML settings as shown below. There is no specificity in the
advanced settings for this setup but your organization could have
some specific constrains to be filled. Please contact your organization
IT for more information.
4. Fill the SAML settings as shown below. There is no specificity in the
advanced settings for this setup but your organization could have
some specific constrains to be filled. Please contact your organization
IT for more information.
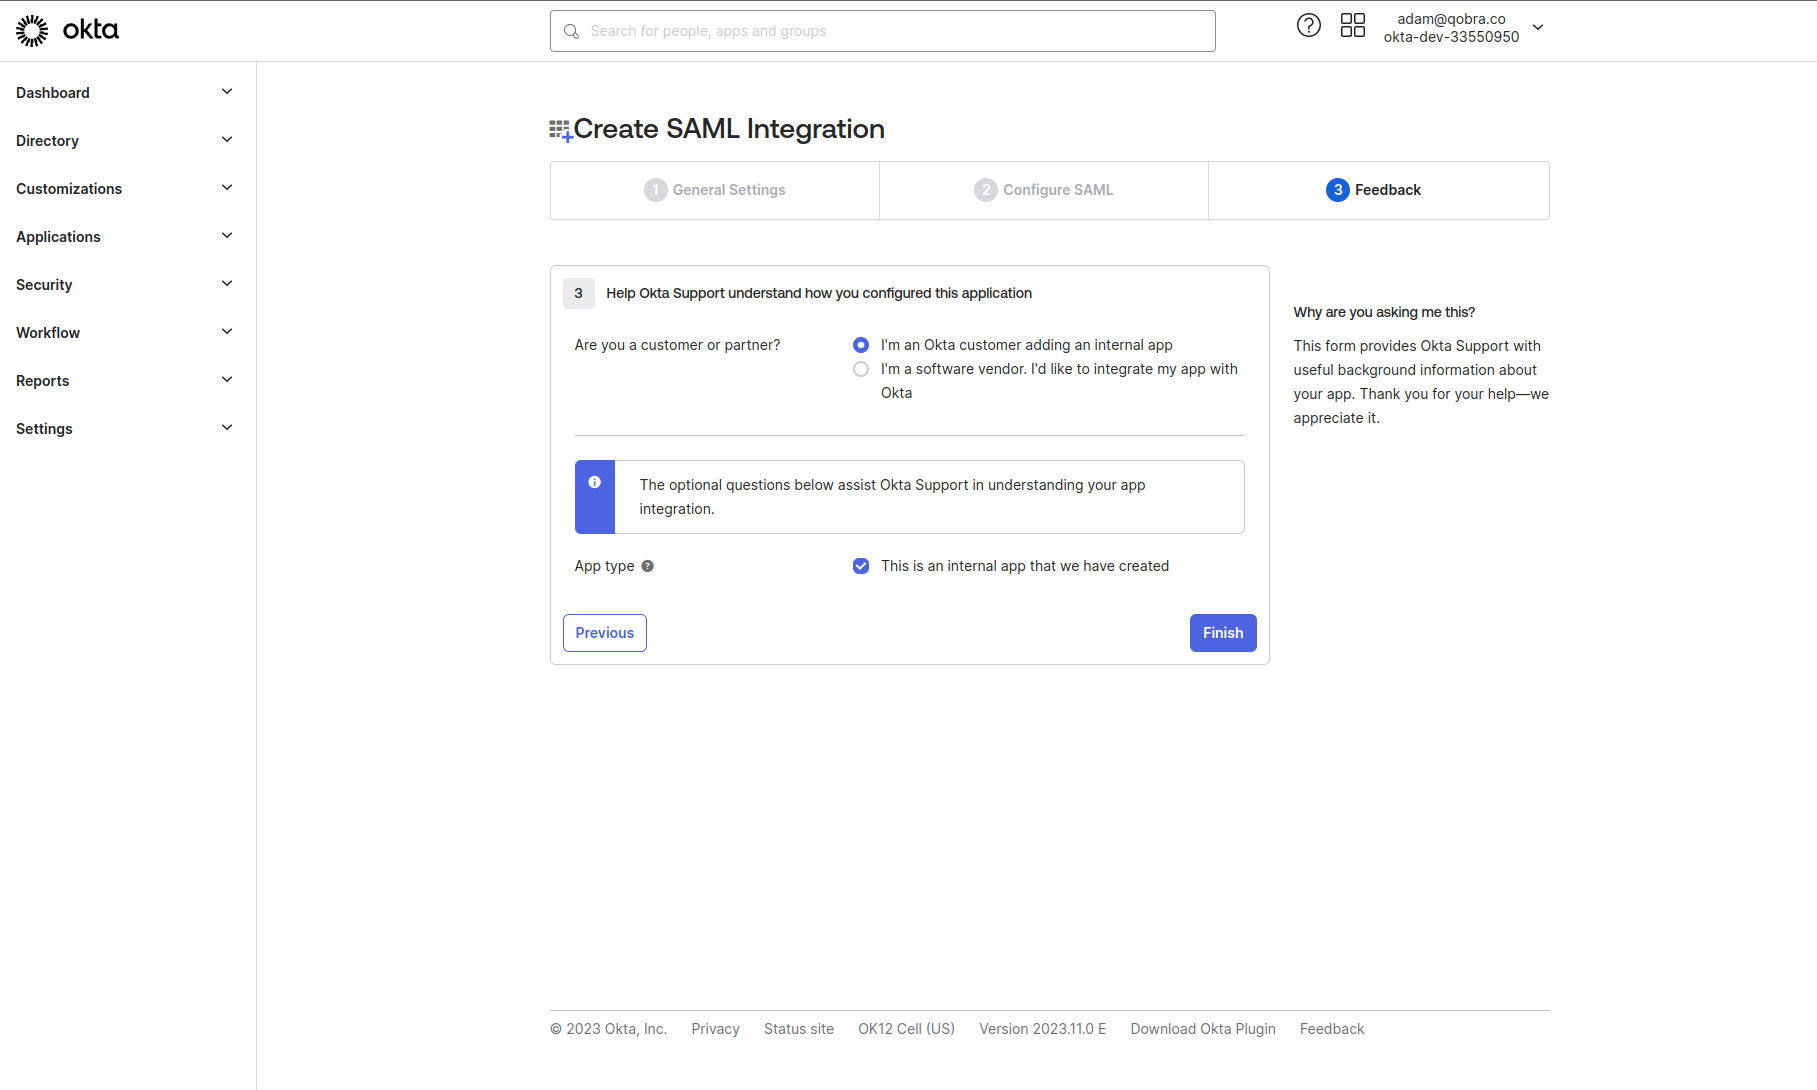
 5. You can finish the setup by providing the following settings.
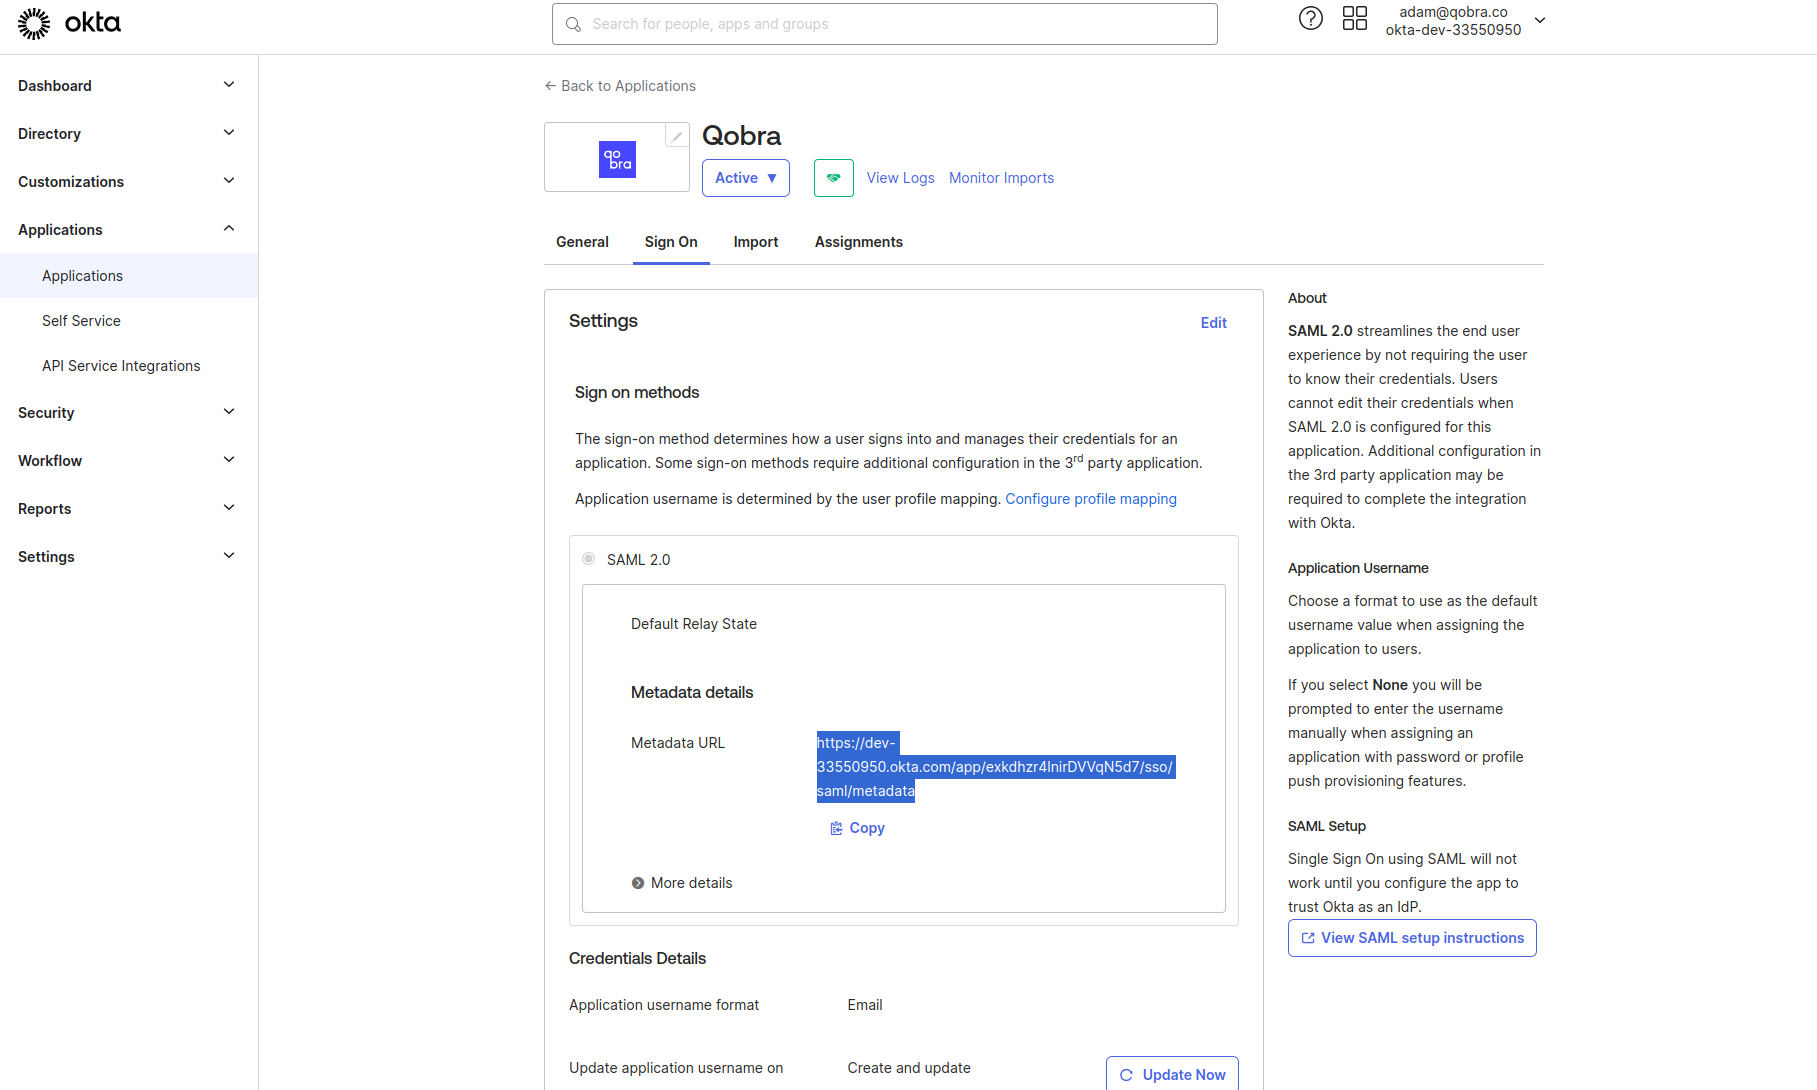
 6. Congratulations you now have access to the metadata URL.
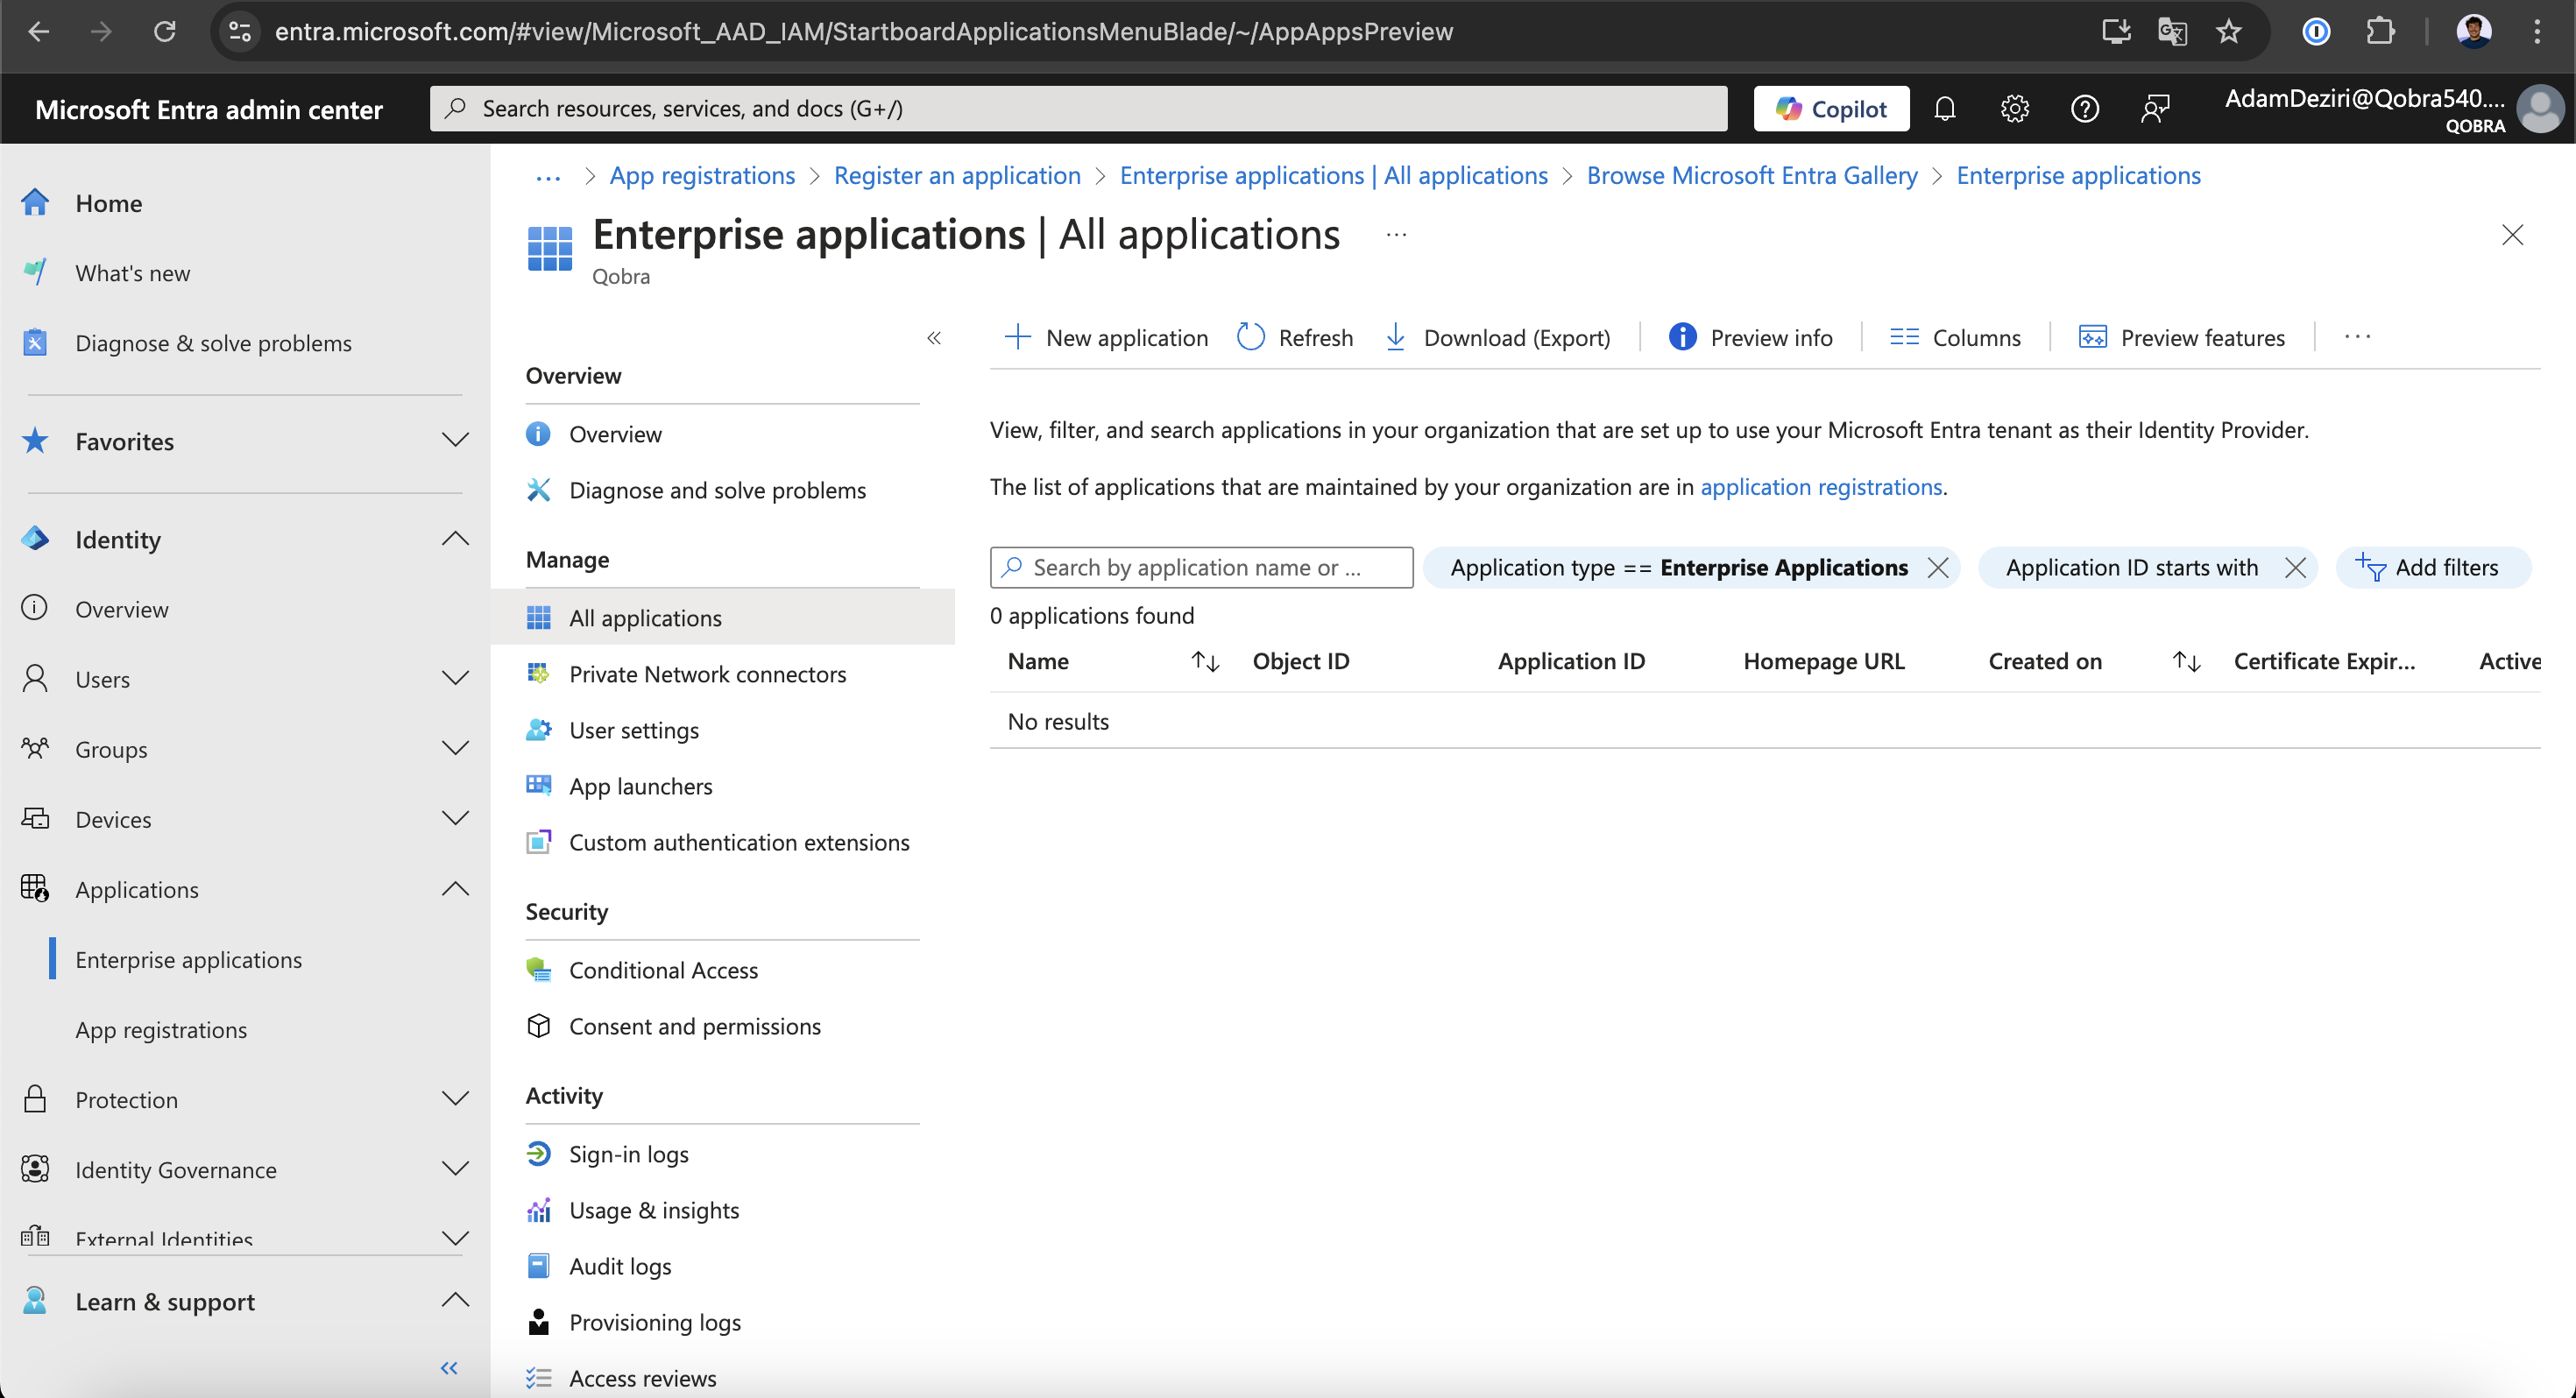
 1. Go to the `Enterprise Applications` tab and click the `New Application` button.
 2. Select the `Microsoft Entra SAML Toolkit` application and put `Qobra` in the name field.
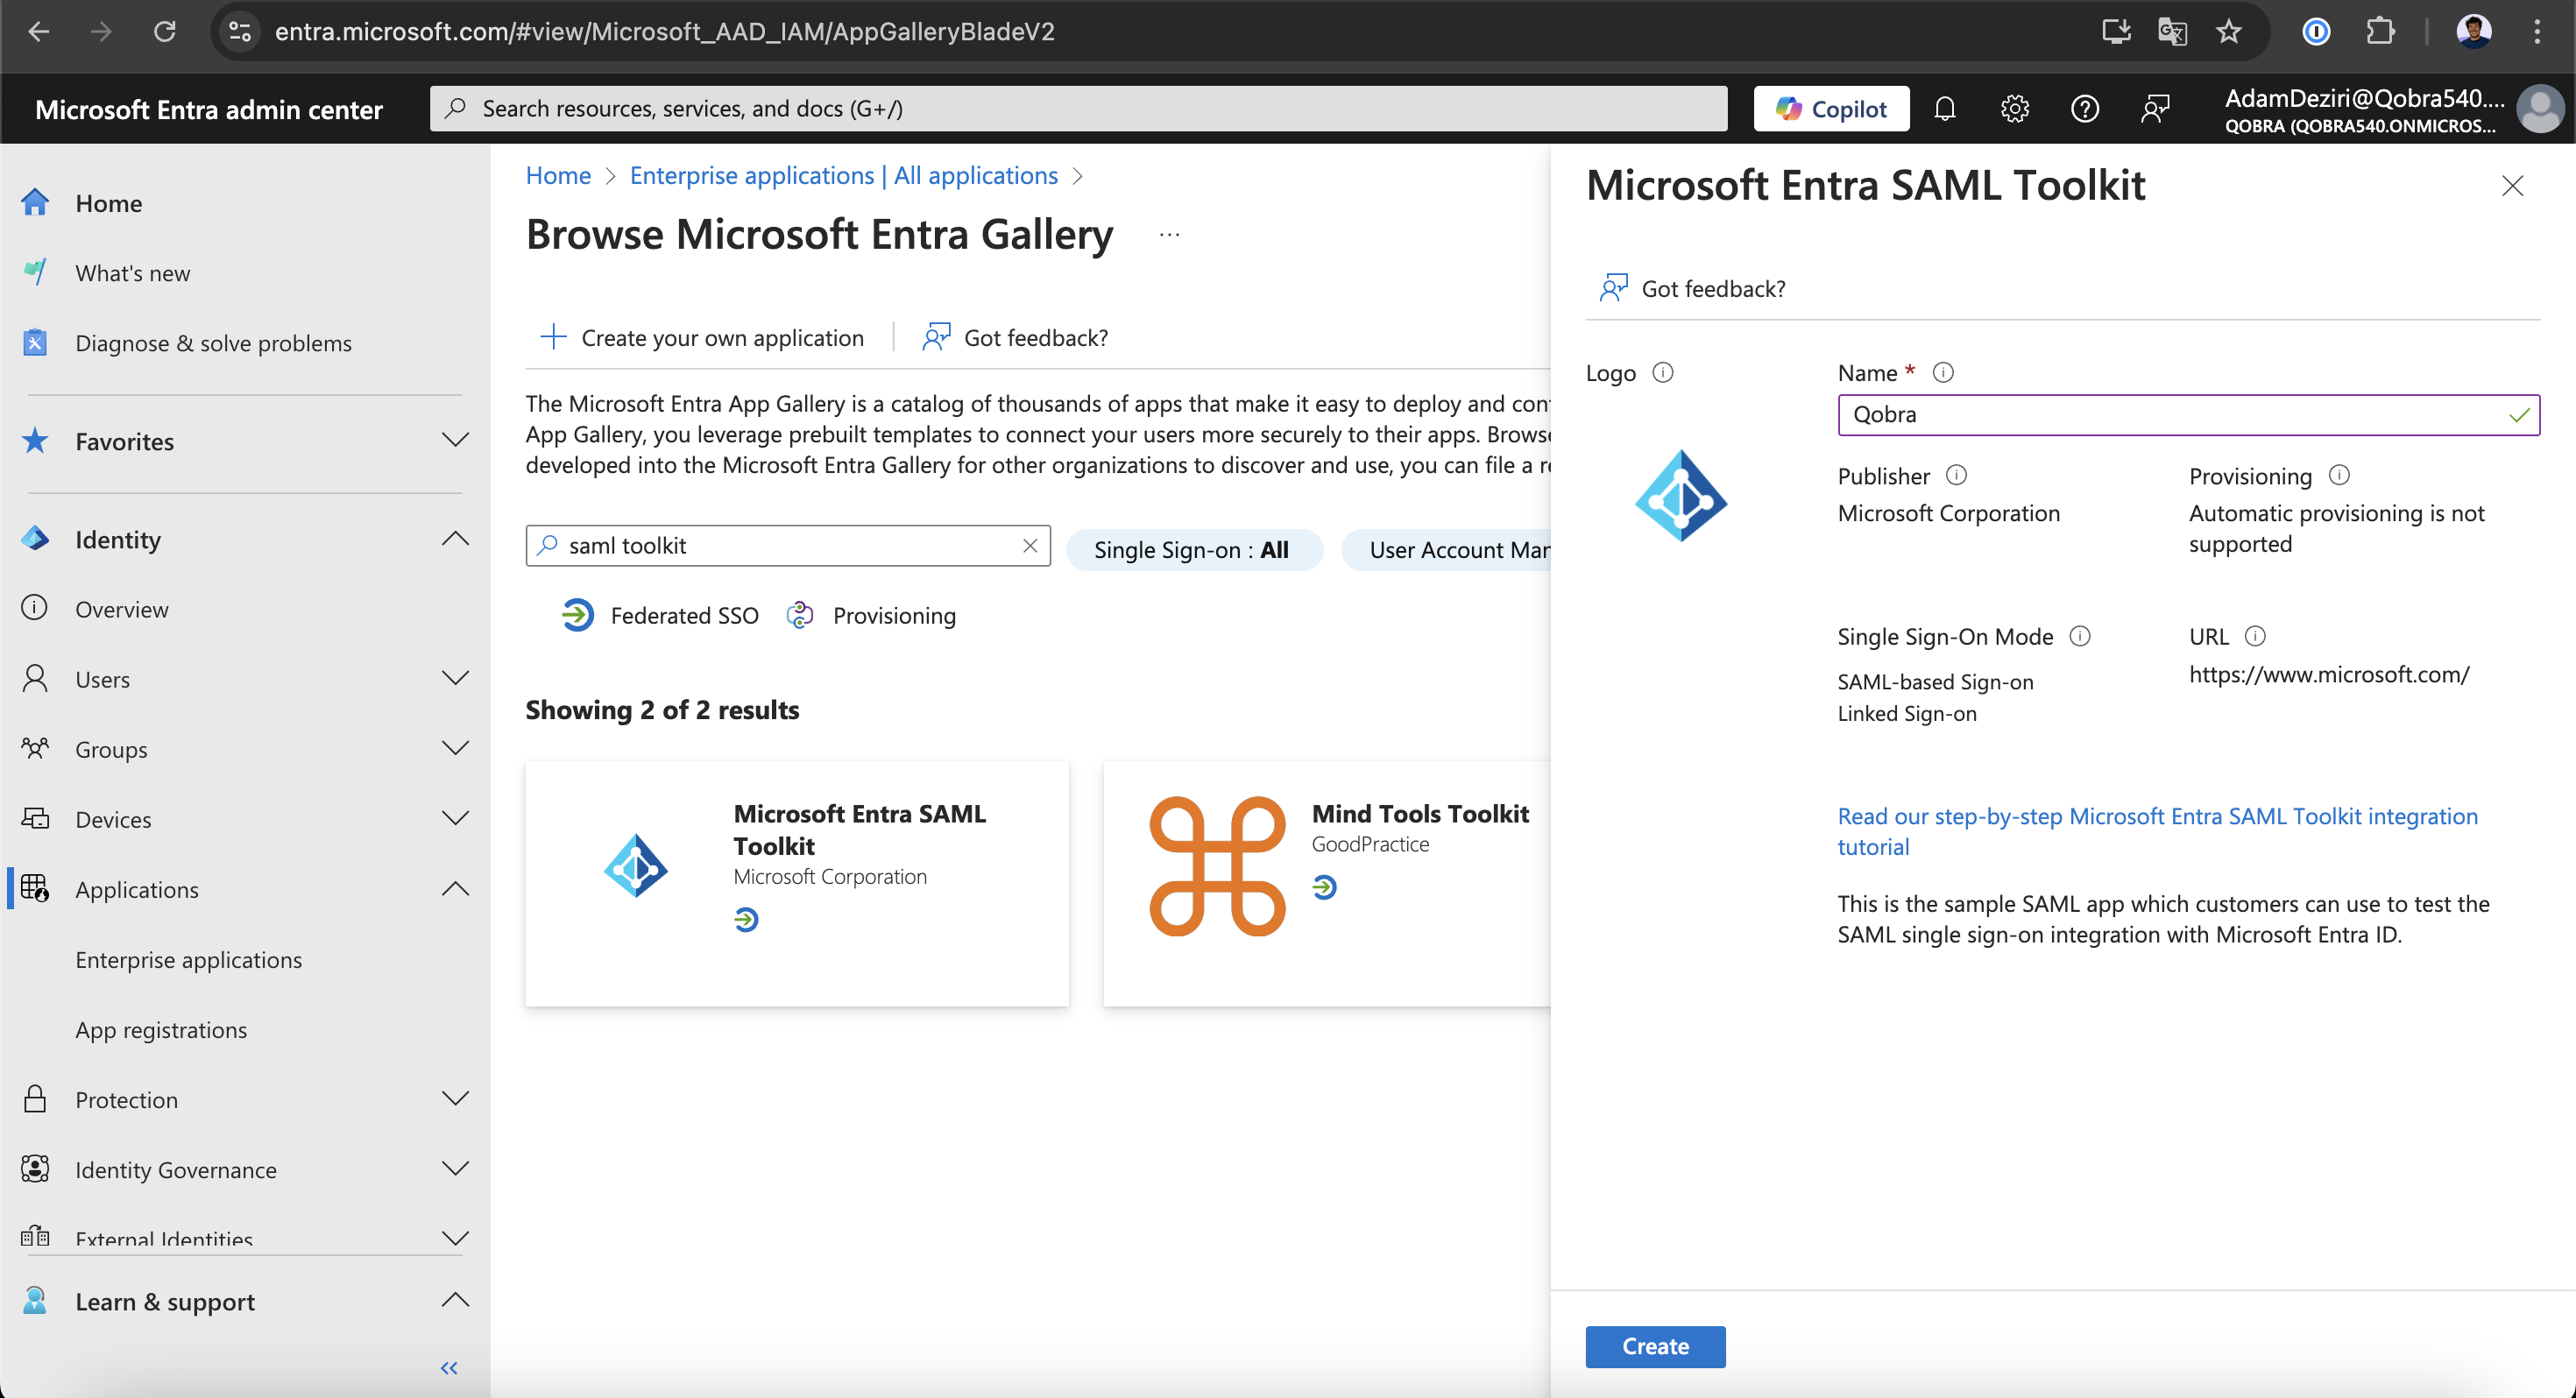 You can now click on the `Create` button
3. Once on your new application, go to the `Single sign-on` tab and click on `SAML`
You can now click on the `Create` button
3. Once on your new application, go to the `Single sign-on` tab and click on `SAML`
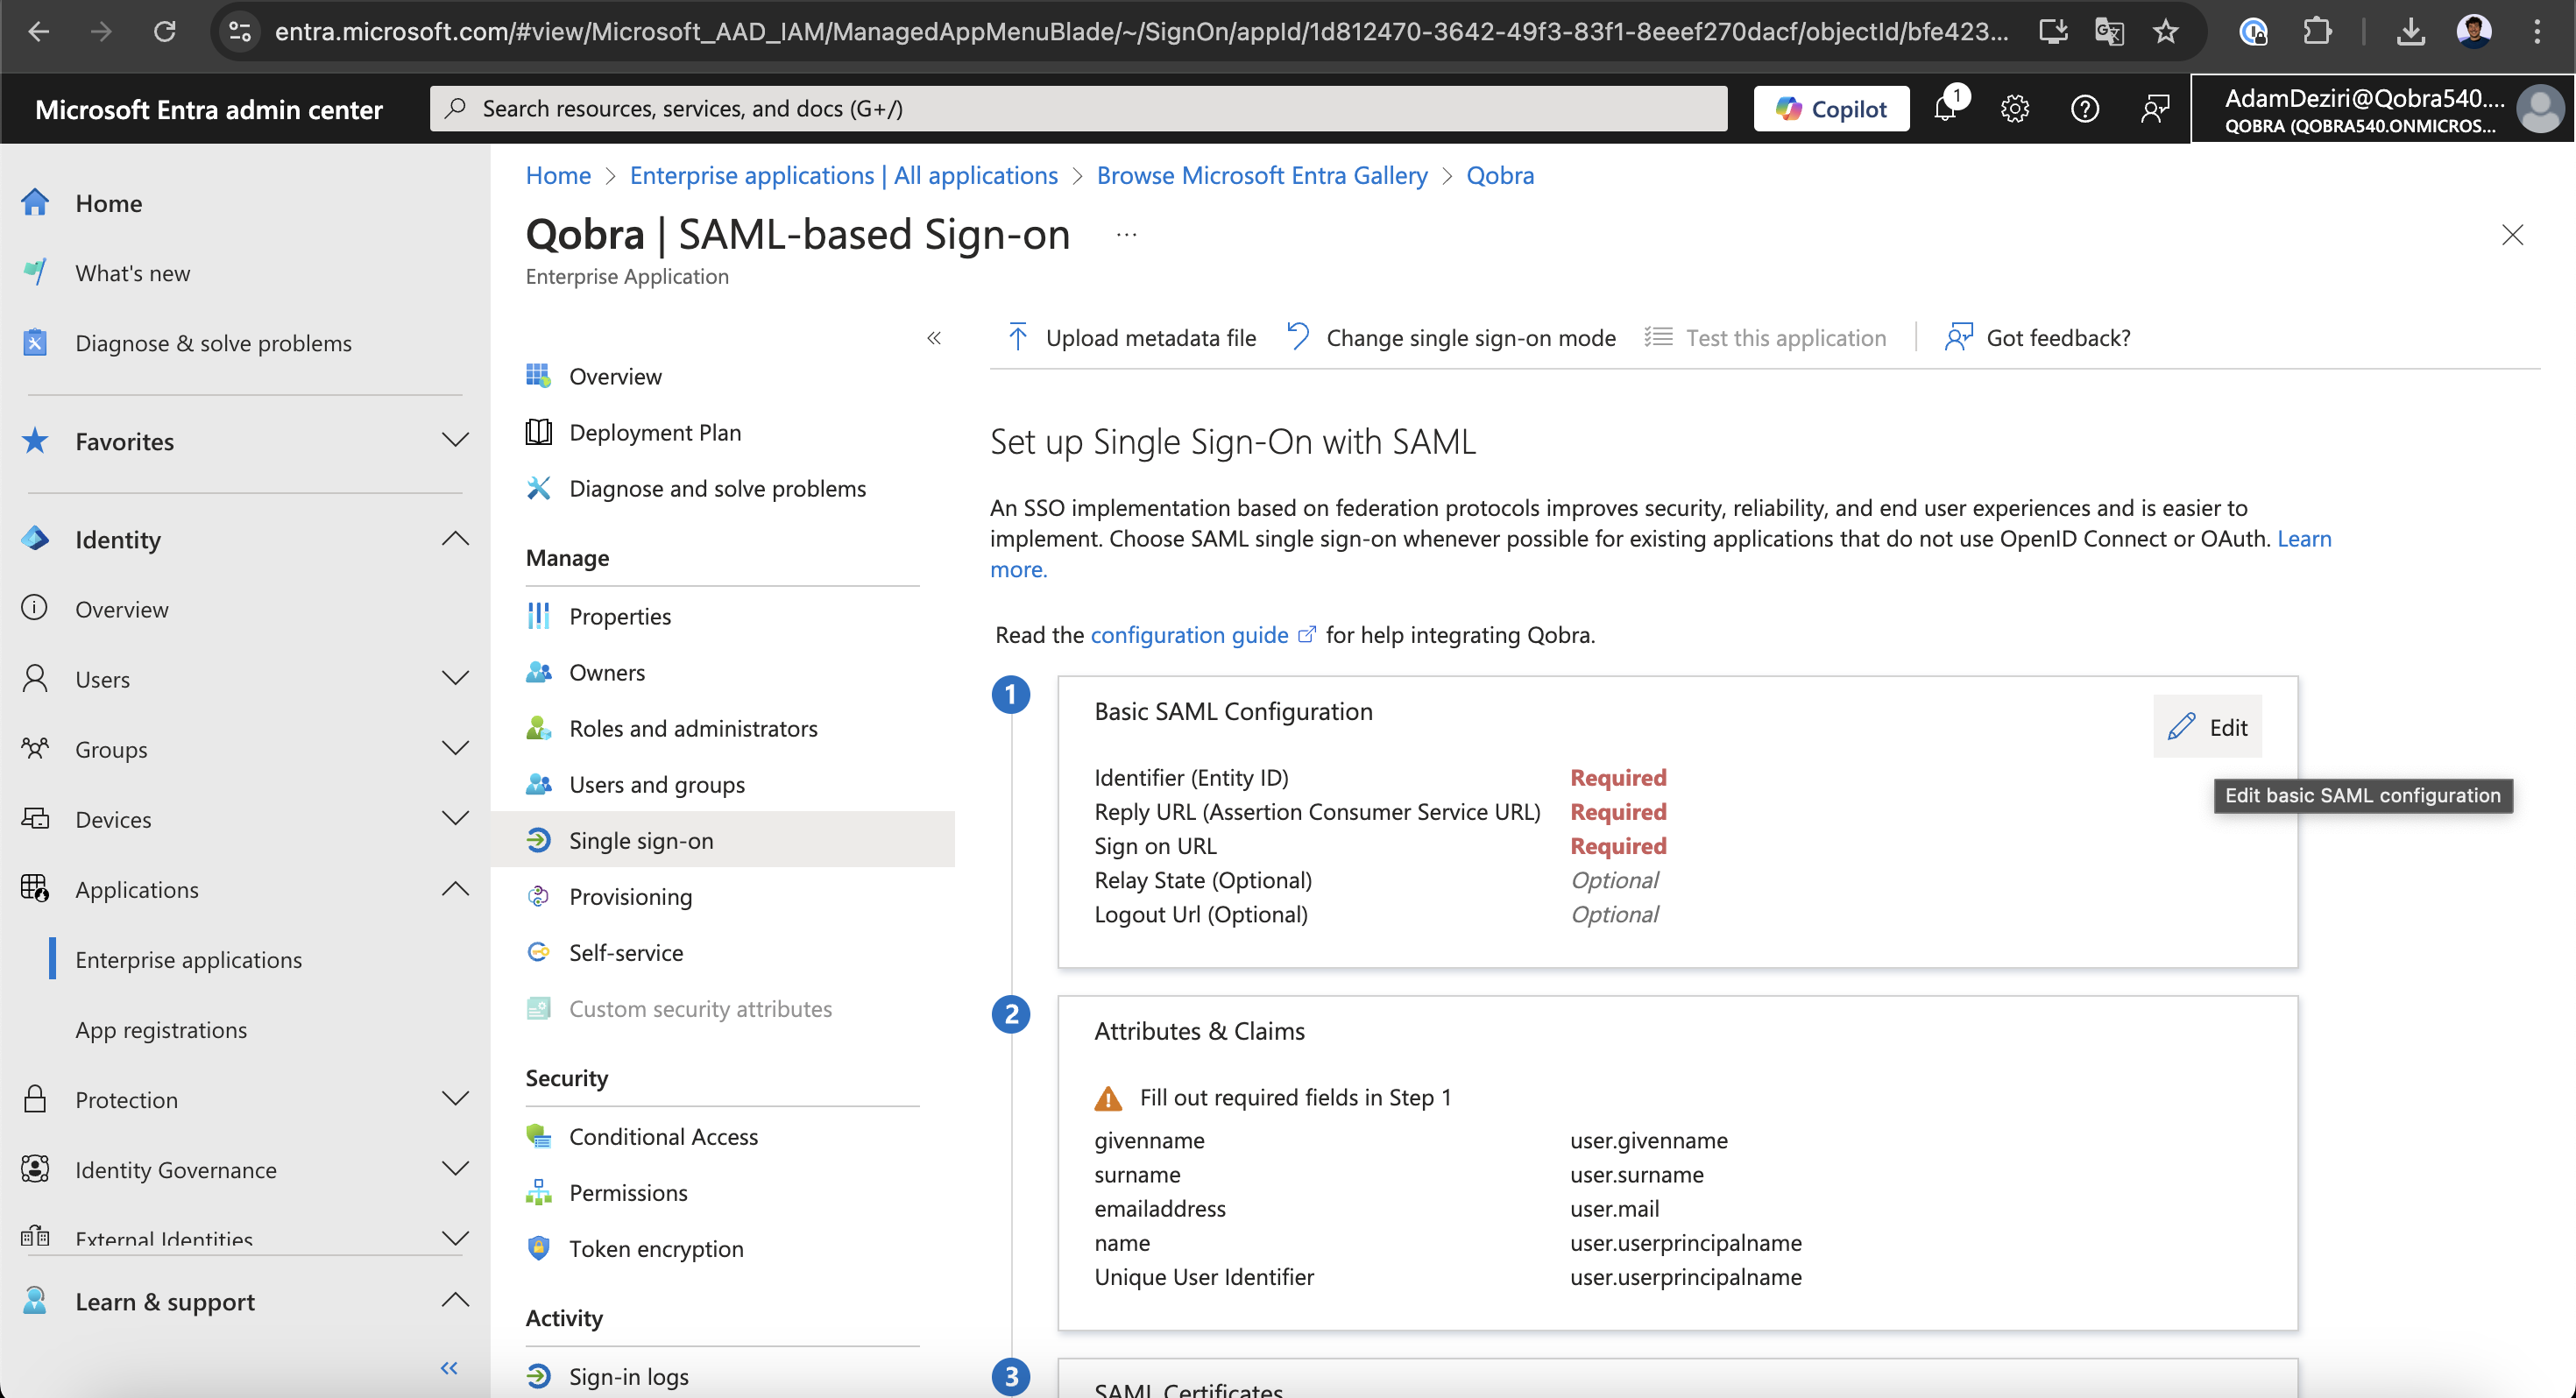
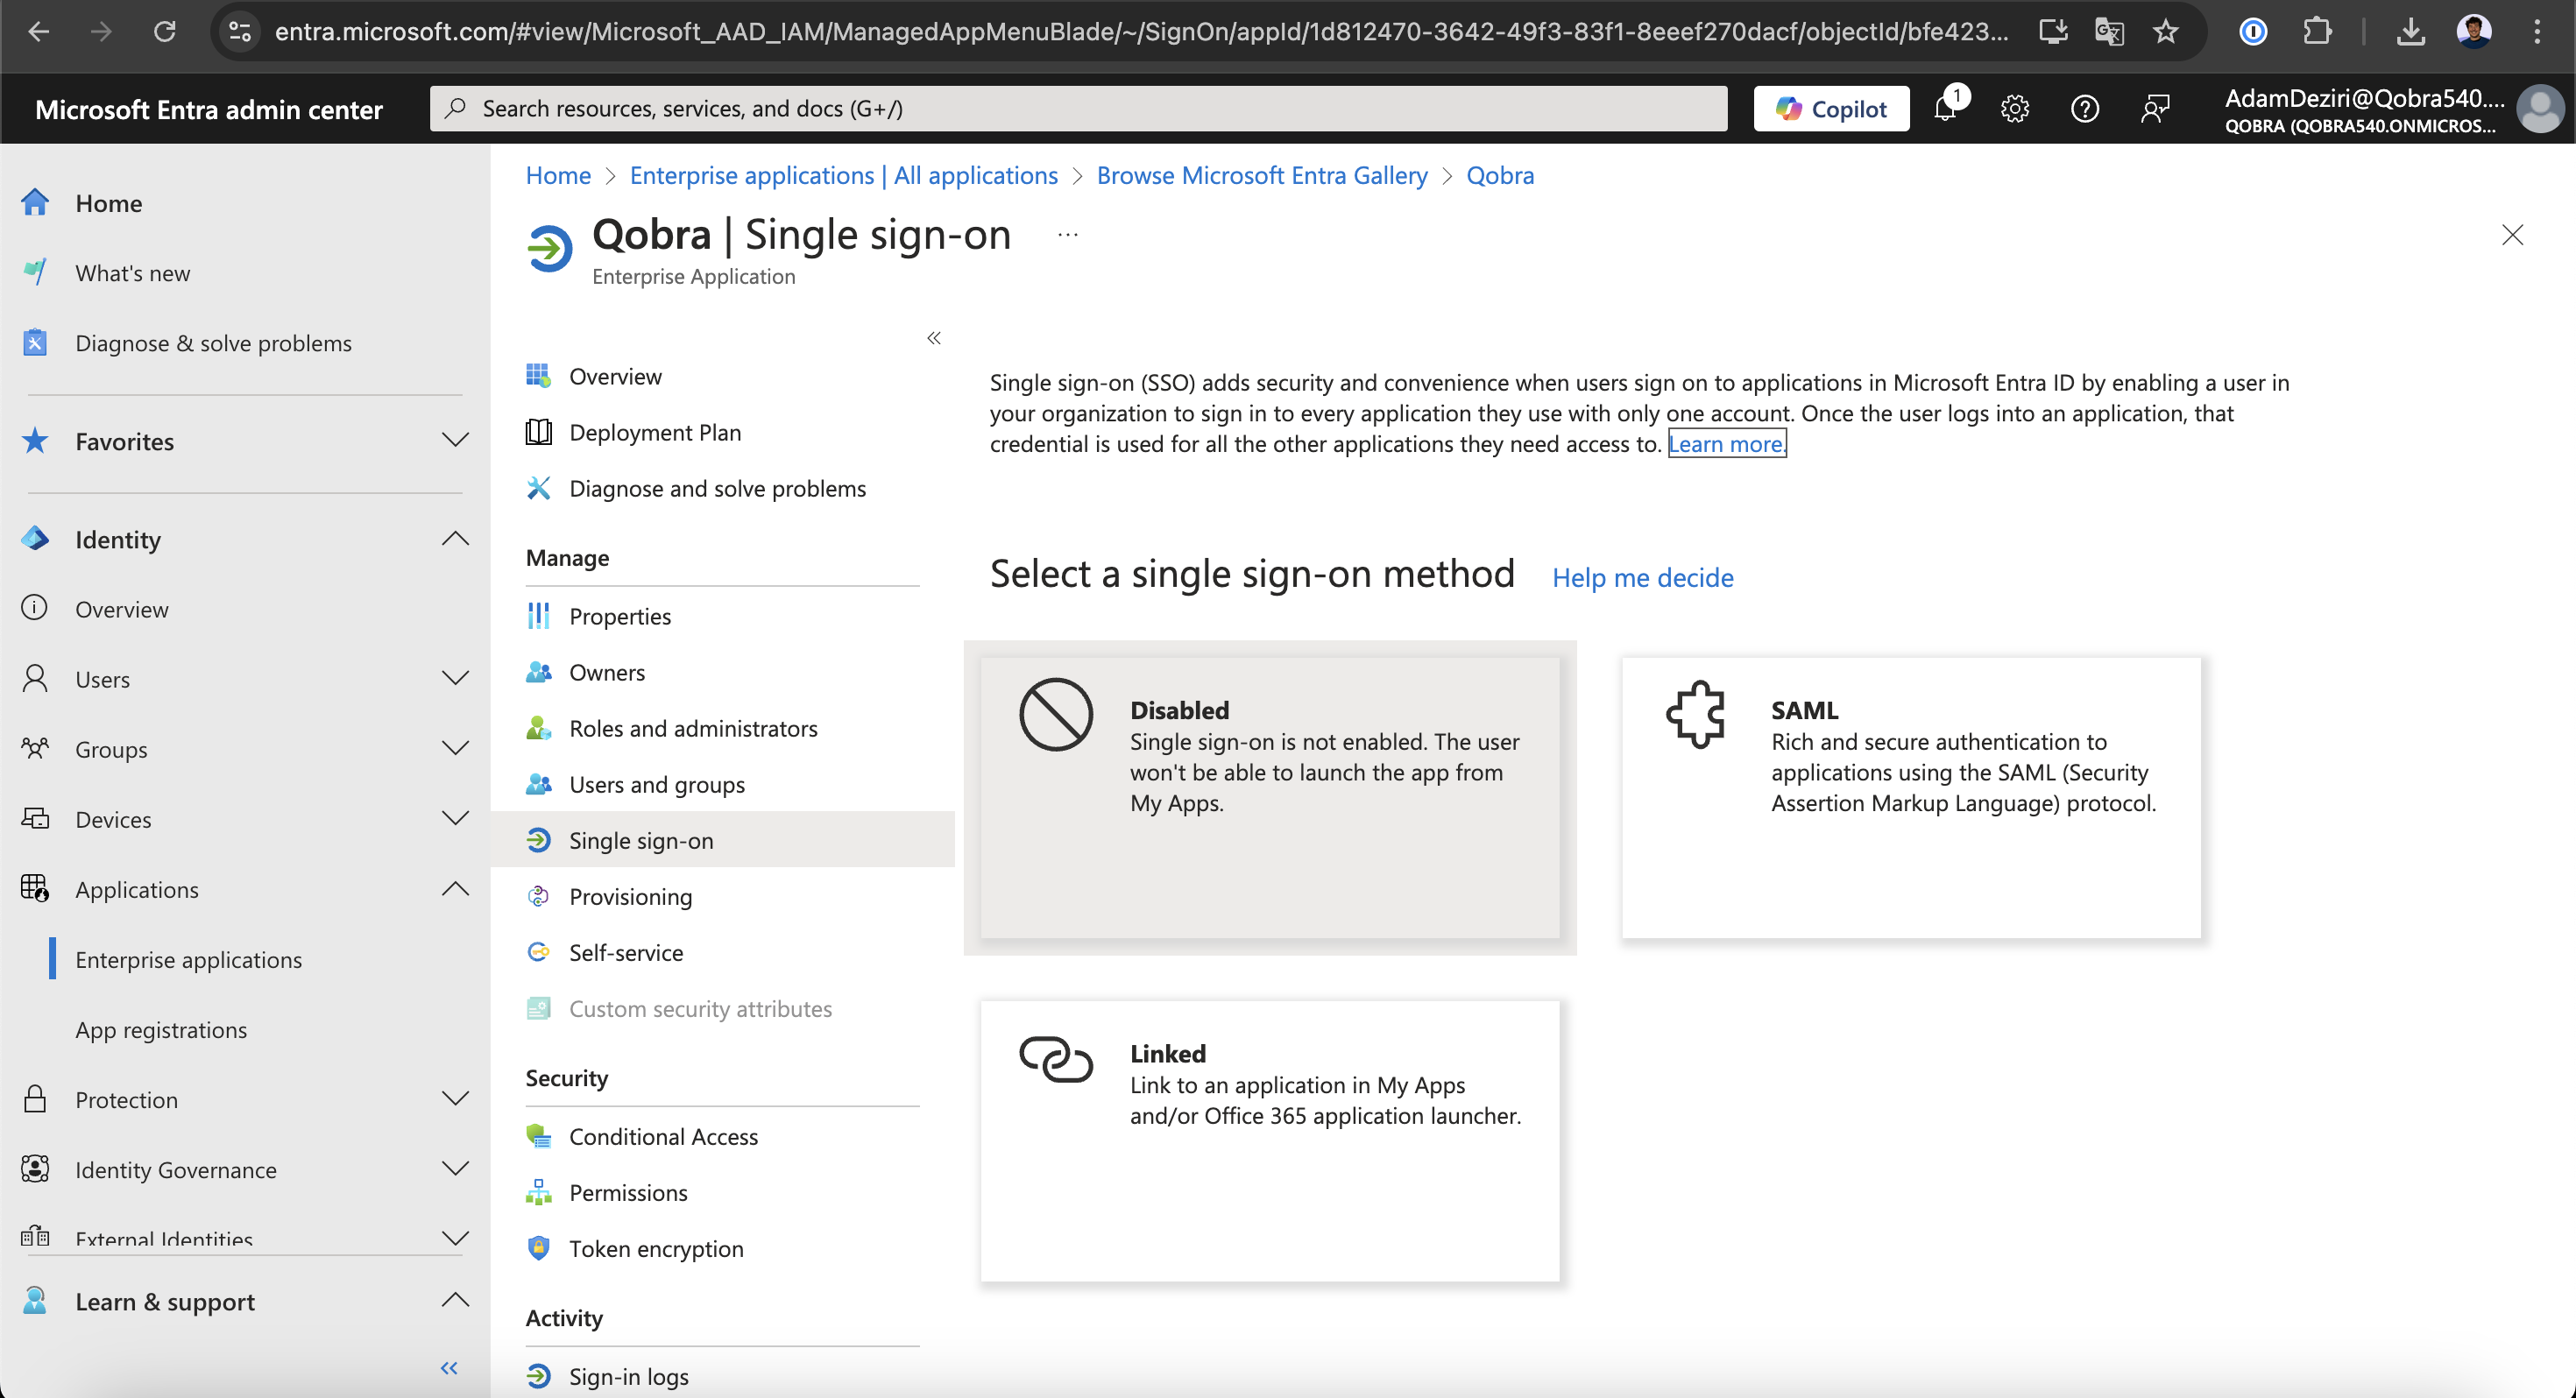 4. You can now click on the `Edit` button to start putting the SAML data
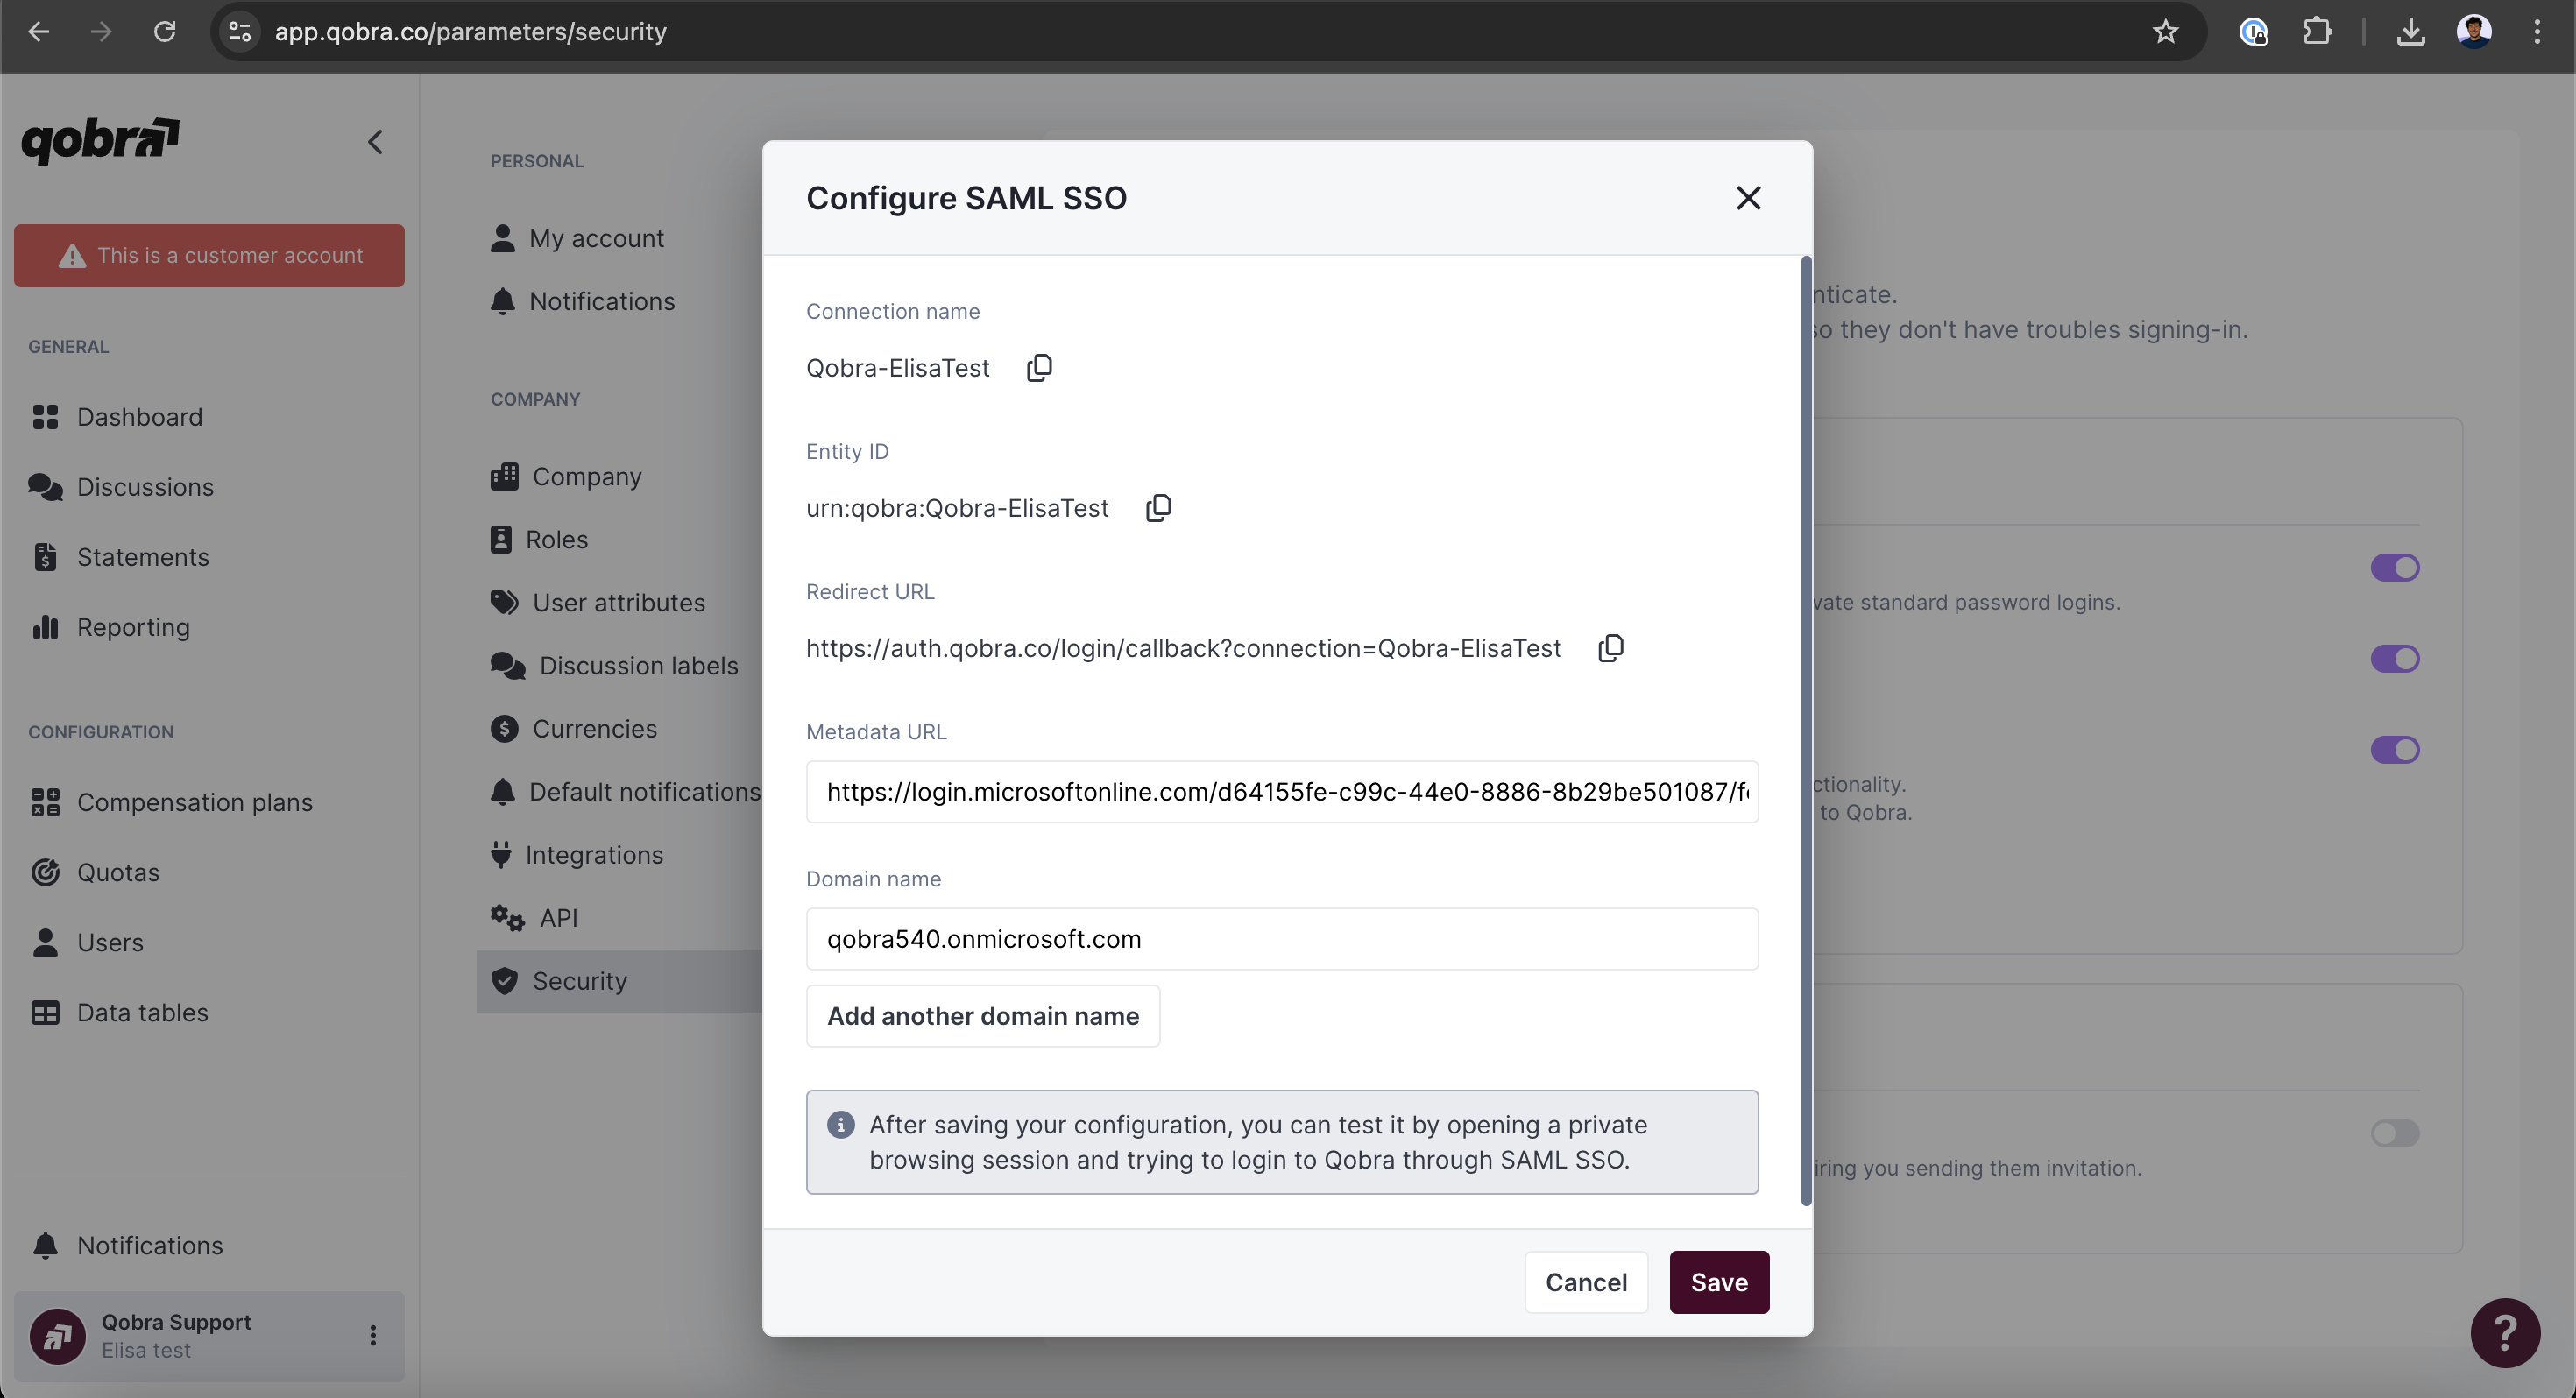
 5. Go to your SSO settings at [https://app.qobra.co/parameters/security](https://app.qobra.co/parameters/security)
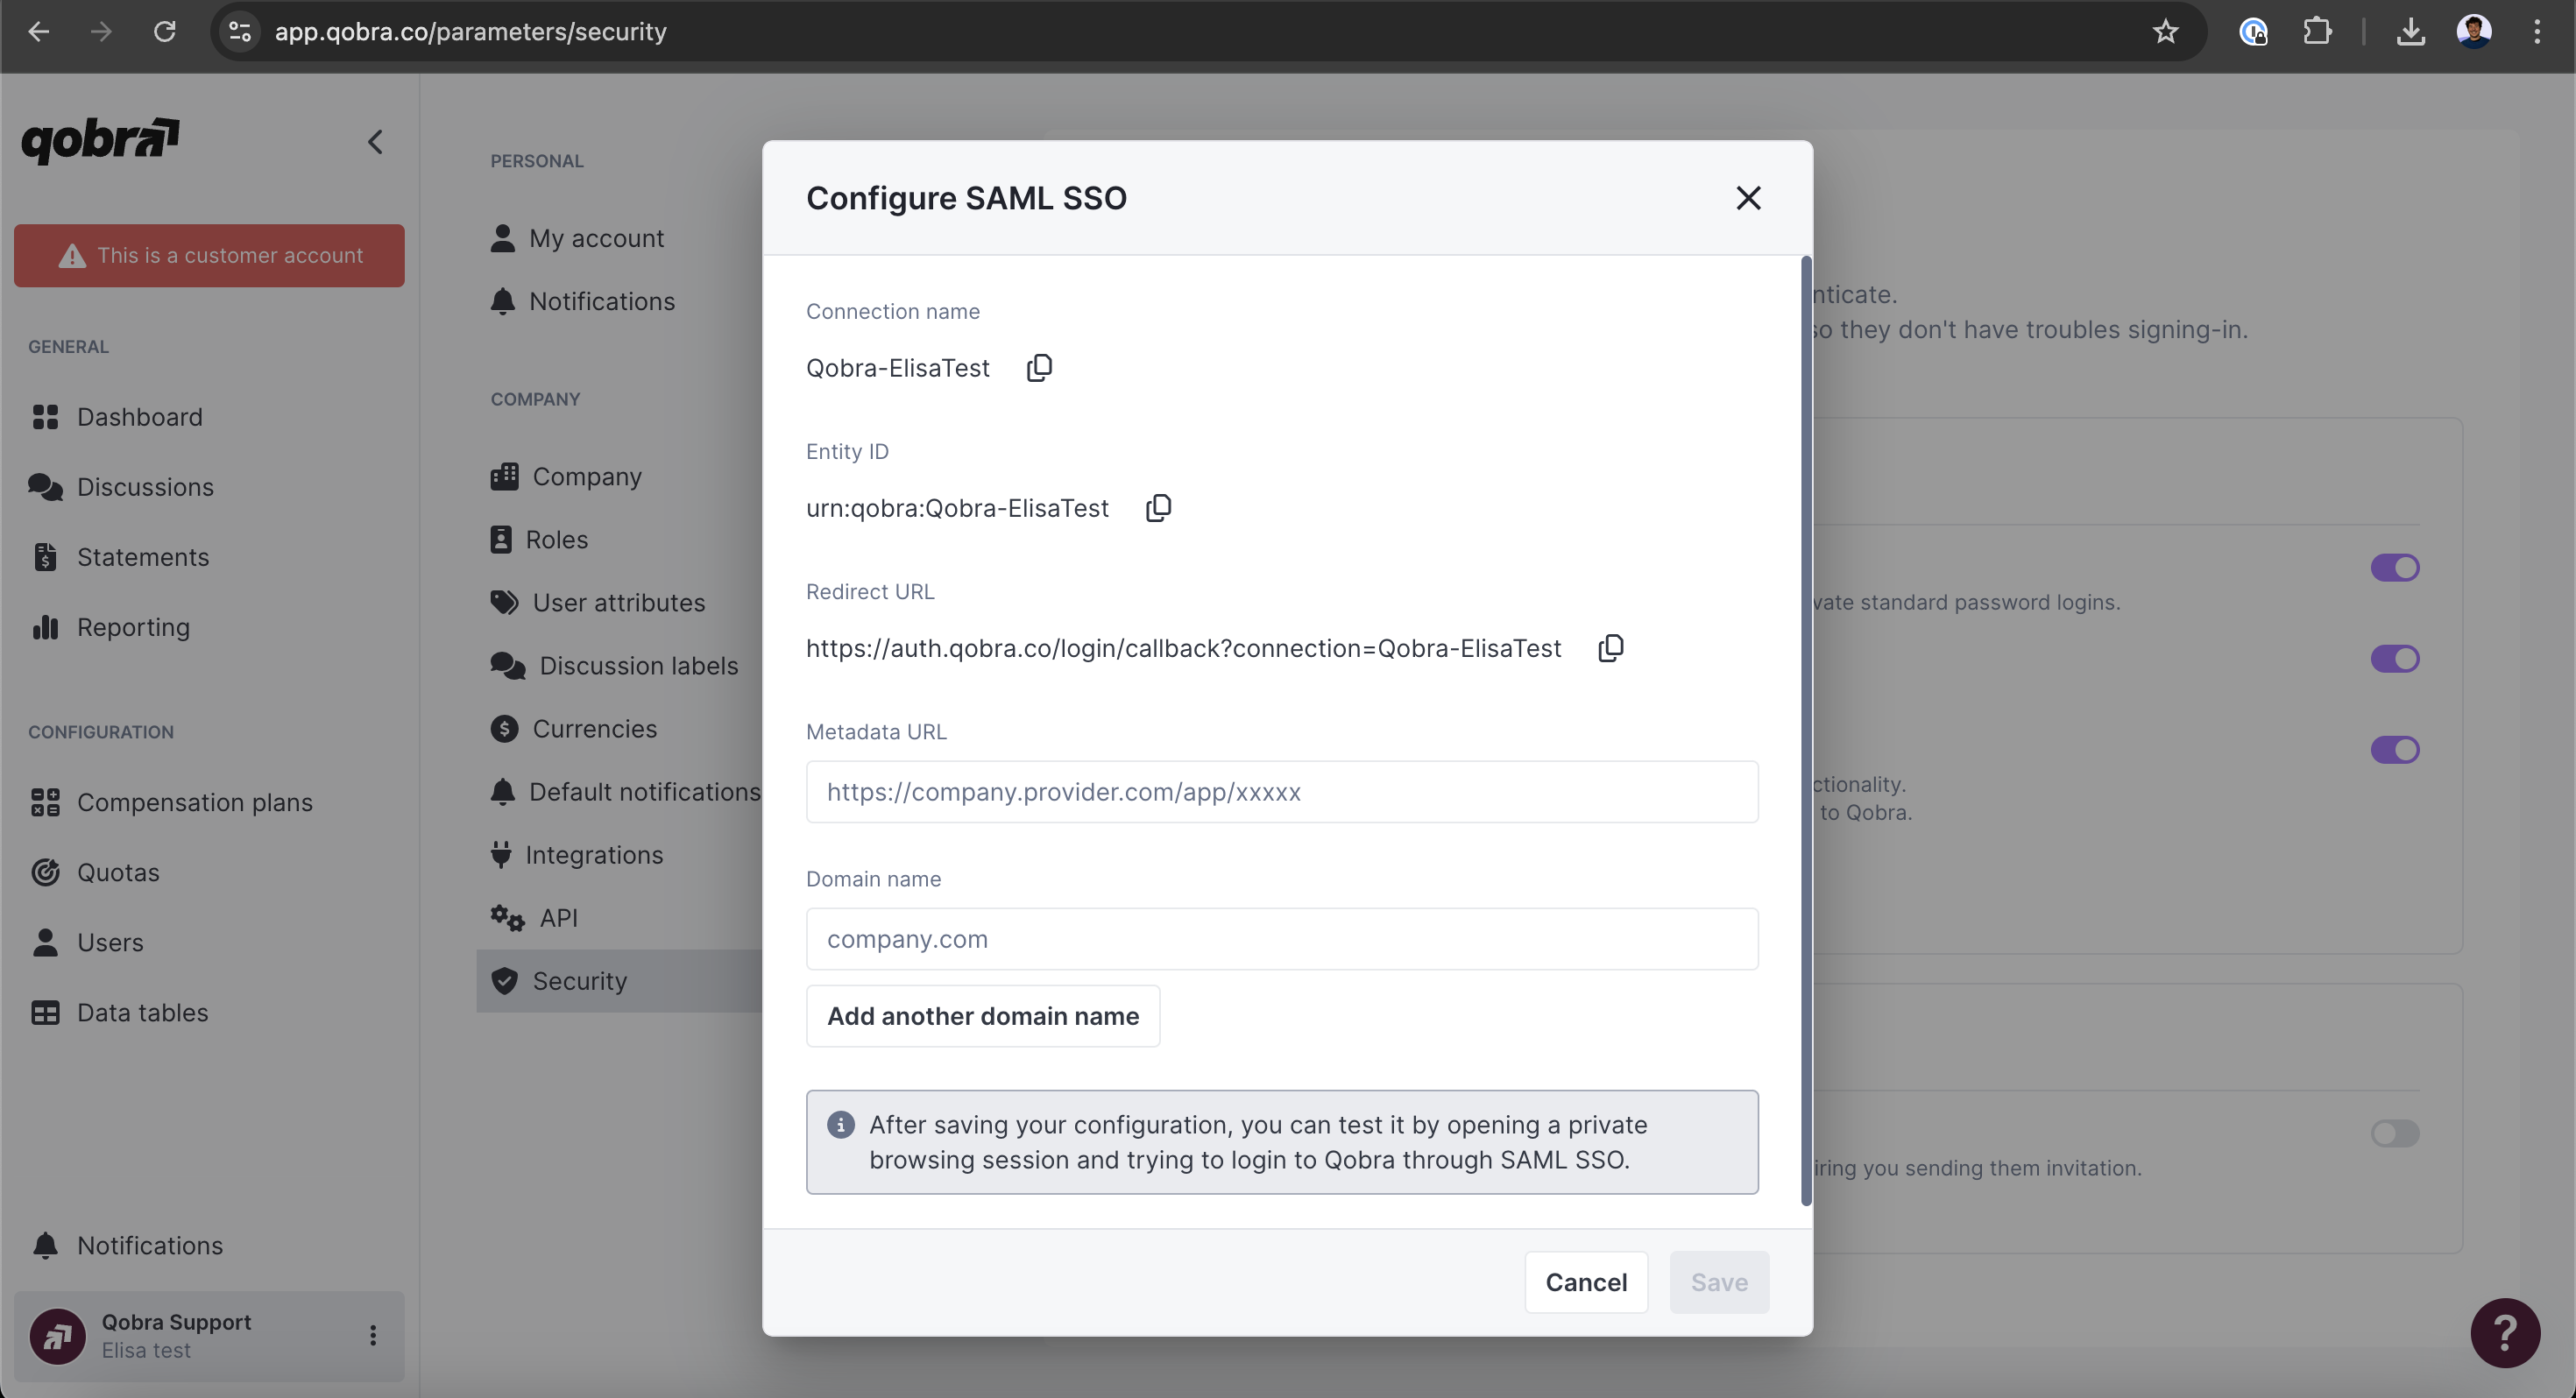 6. Thanks to the information gathered on your SSO settings you can now fill those 3 fields:
* Entity ID
* Reply URL (`Redirect URL` in Qobra)
* Sign on URL (value: [https://app.qobra.com/auth](https://app.qobra.com/auth))
6. Thanks to the information gathered on your SSO settings you can now fill those 3 fields:
* Entity ID
* Reply URL (`Redirect URL` in Qobra)
* Sign on URL (value: [https://app.qobra.com/auth](https://app.qobra.com/auth))
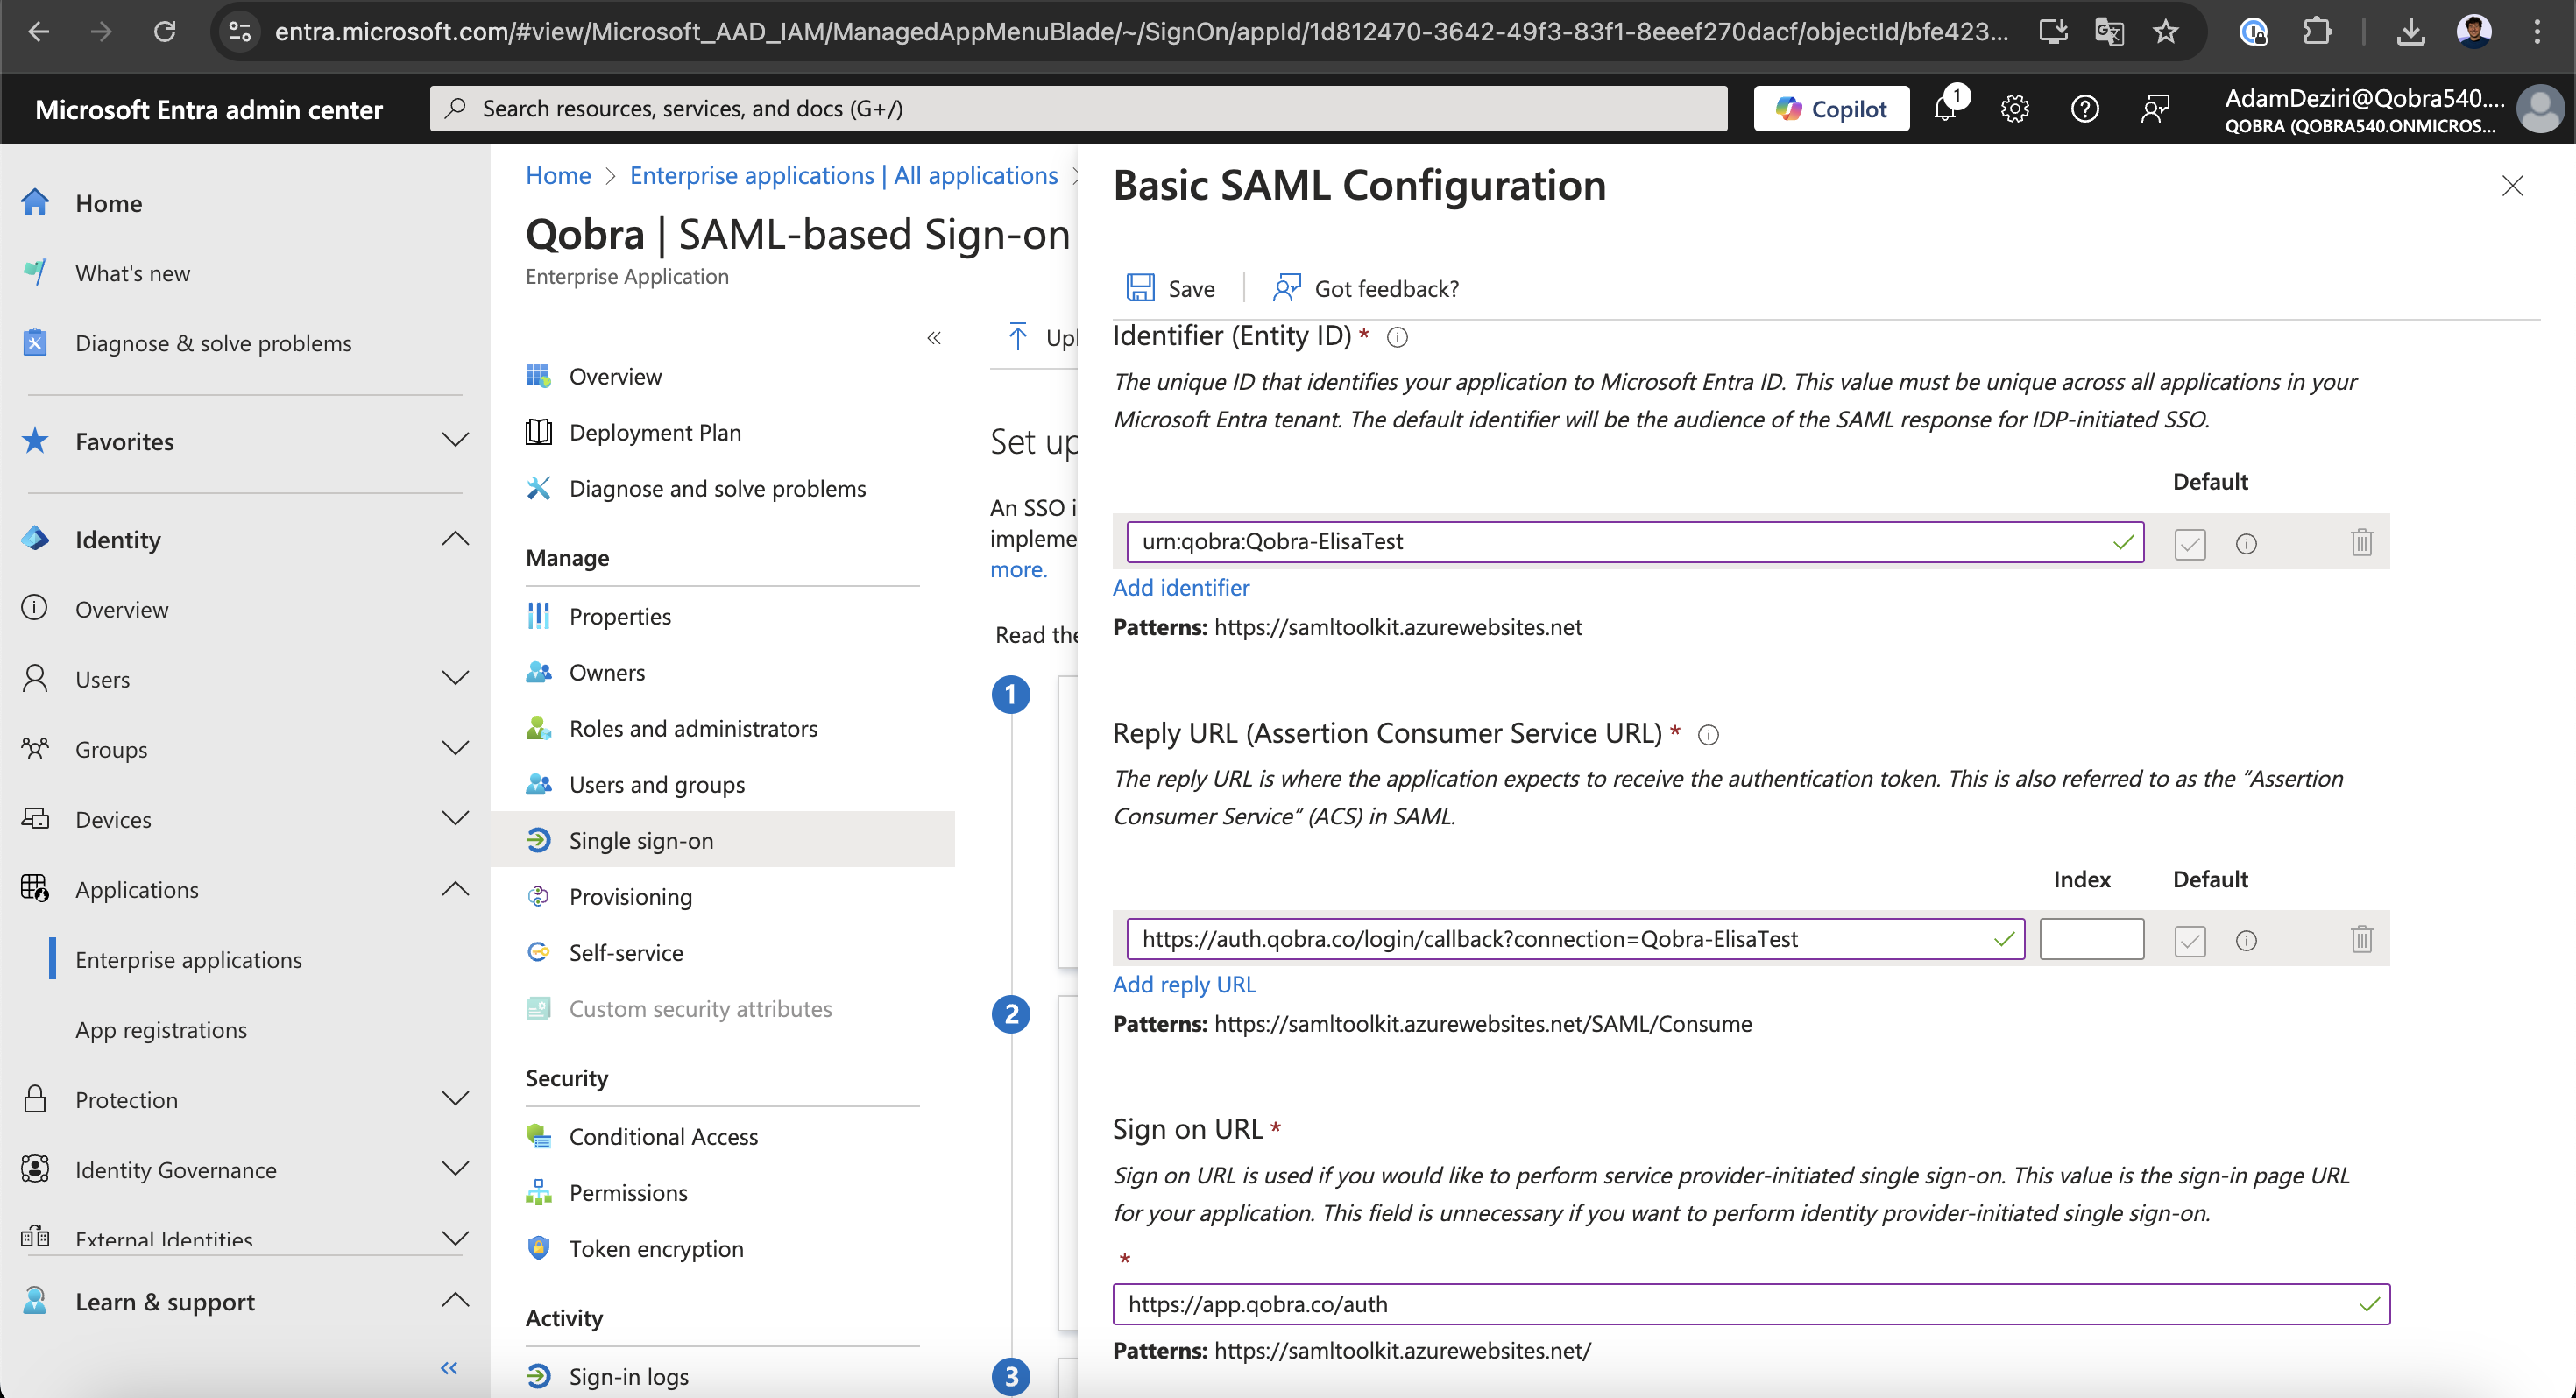 After filling those fields, you can now click on the `Save` button.
5. Copy the `App Federation Metadata Url` in the `SAML Certificates` section and fill it in Qobra SSO config (`Metadata URL` field)
After filling those fields, you can now click on the `Save` button.
5. Copy the `App Federation Metadata Url` in the `SAML Certificates` section and fill it in Qobra SSO config (`Metadata URL` field)
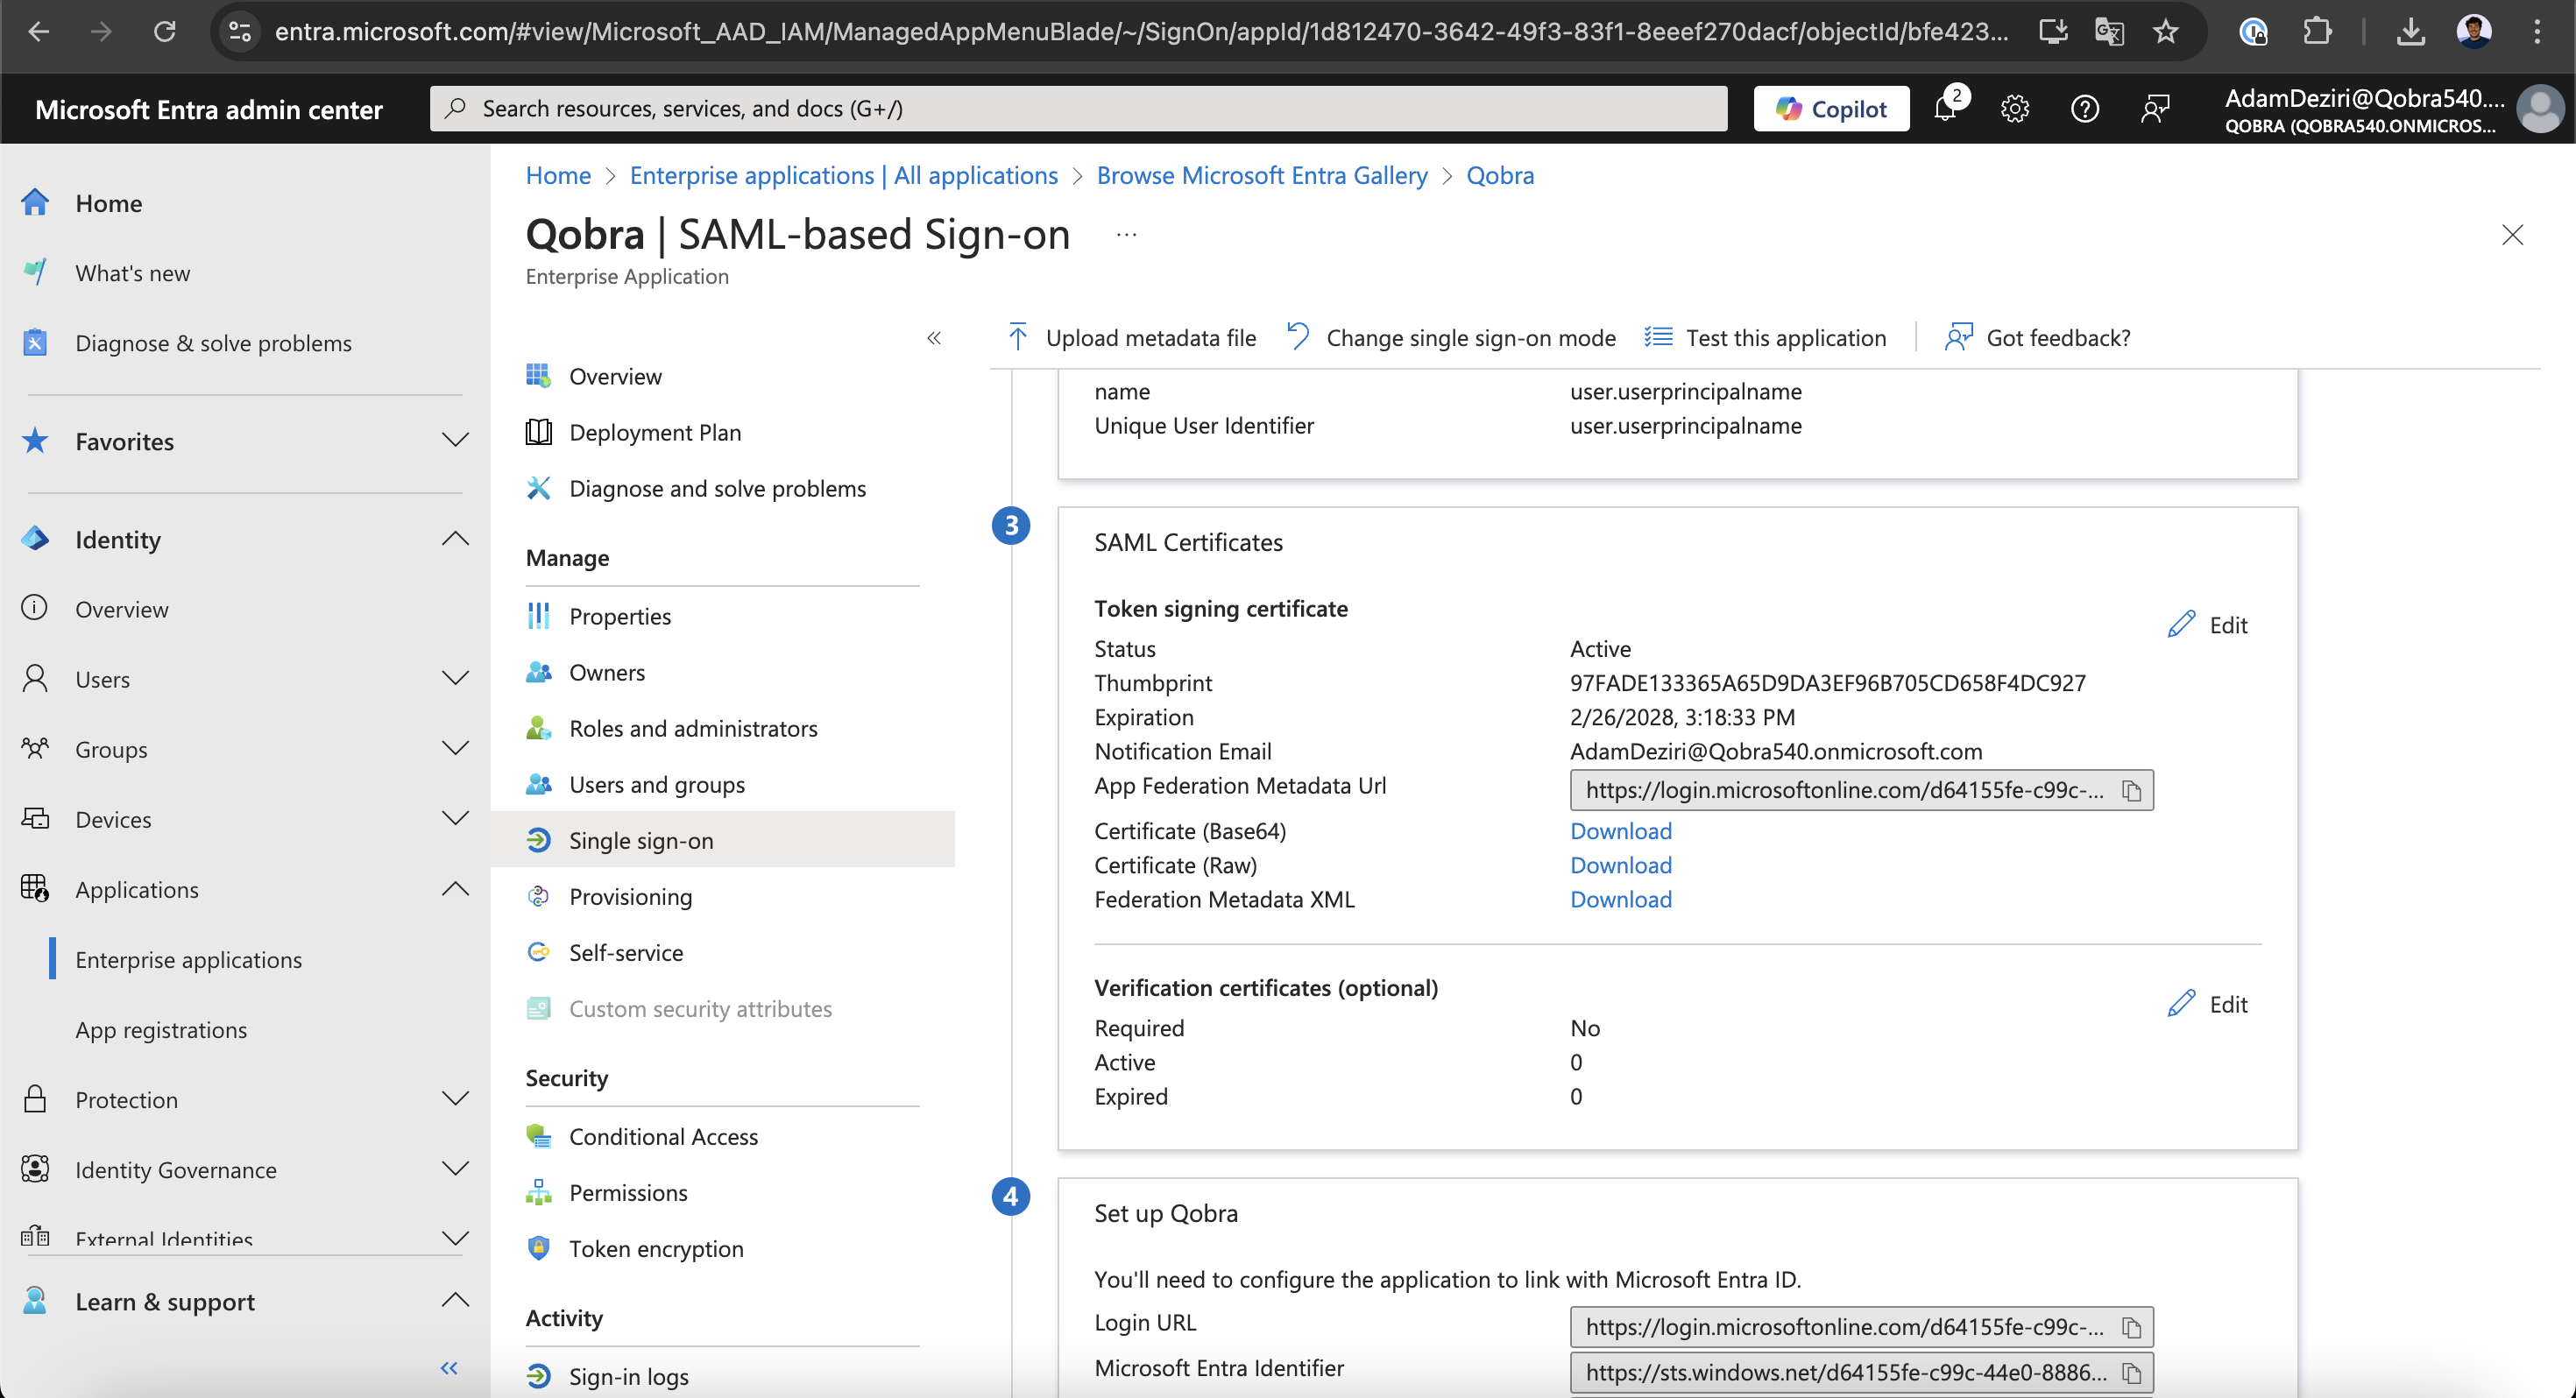 You should also fill the domain name of your email in the `Domain name` field
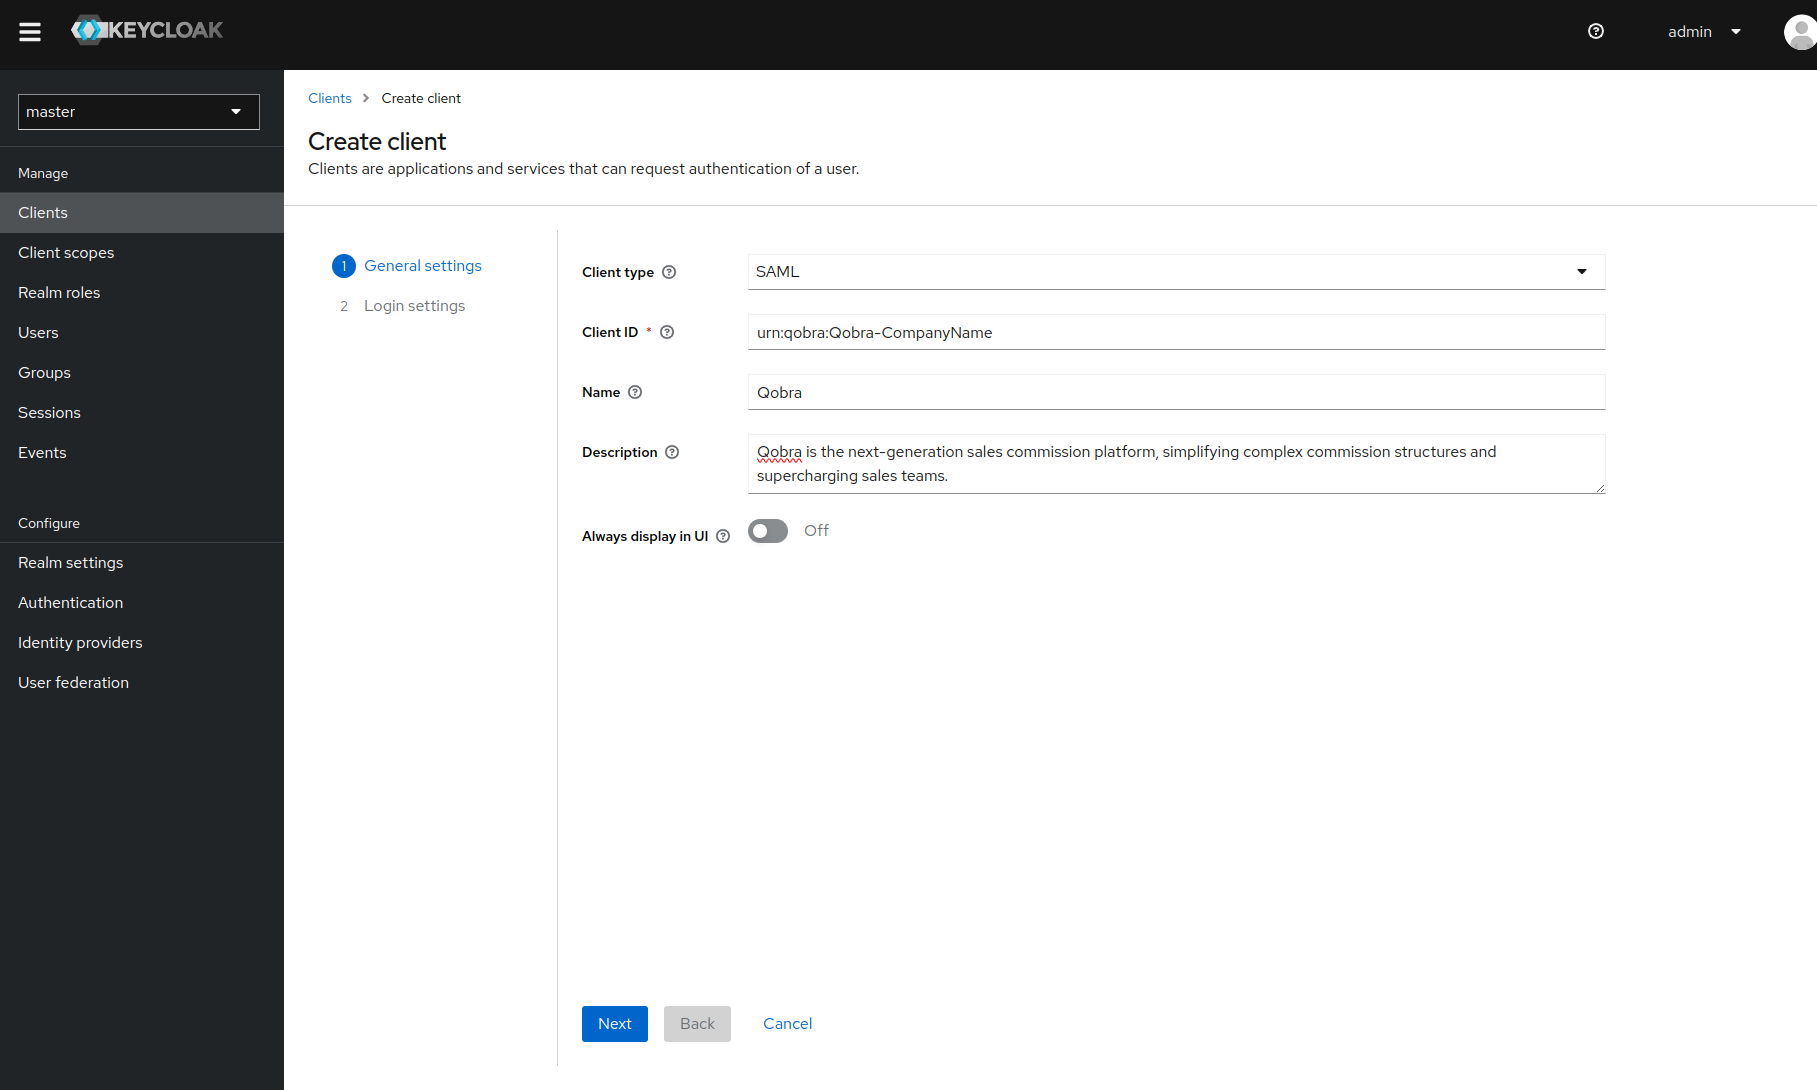
 1. Go to administration UI to add a client.
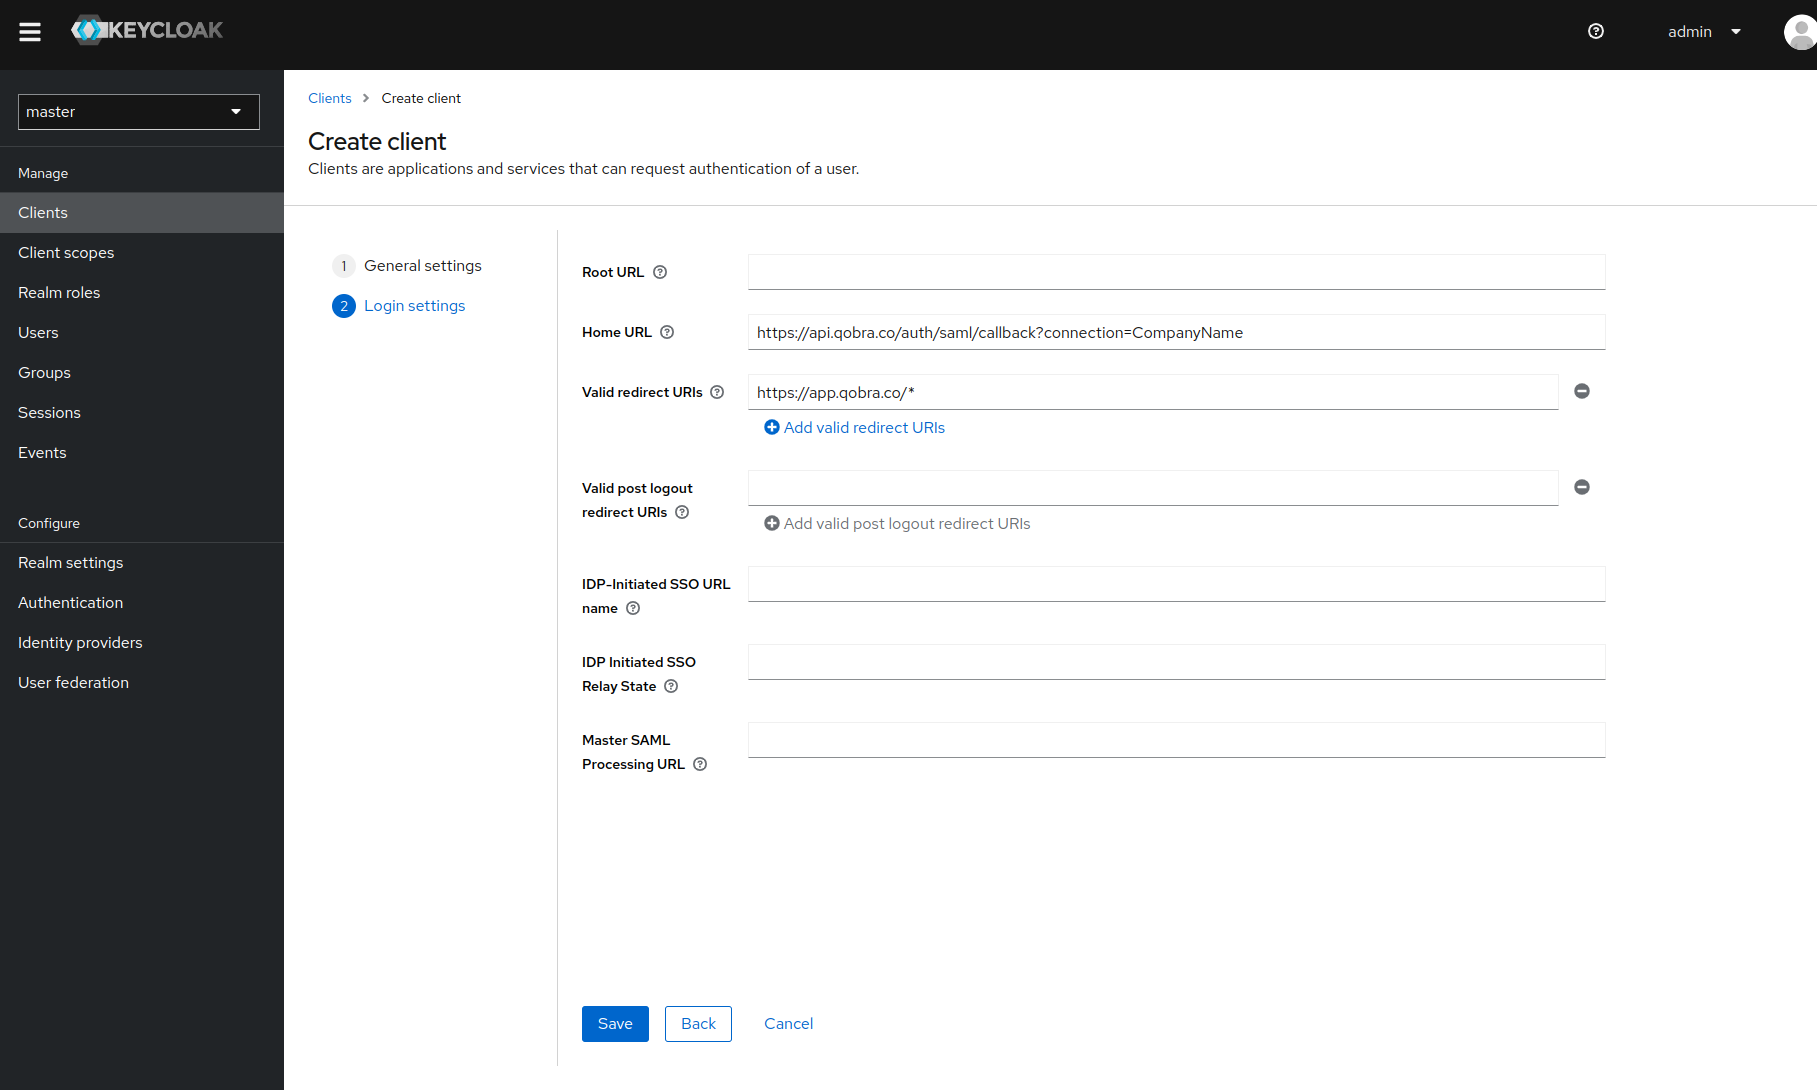
 2. Go to the next step and complete login settings as shown below.
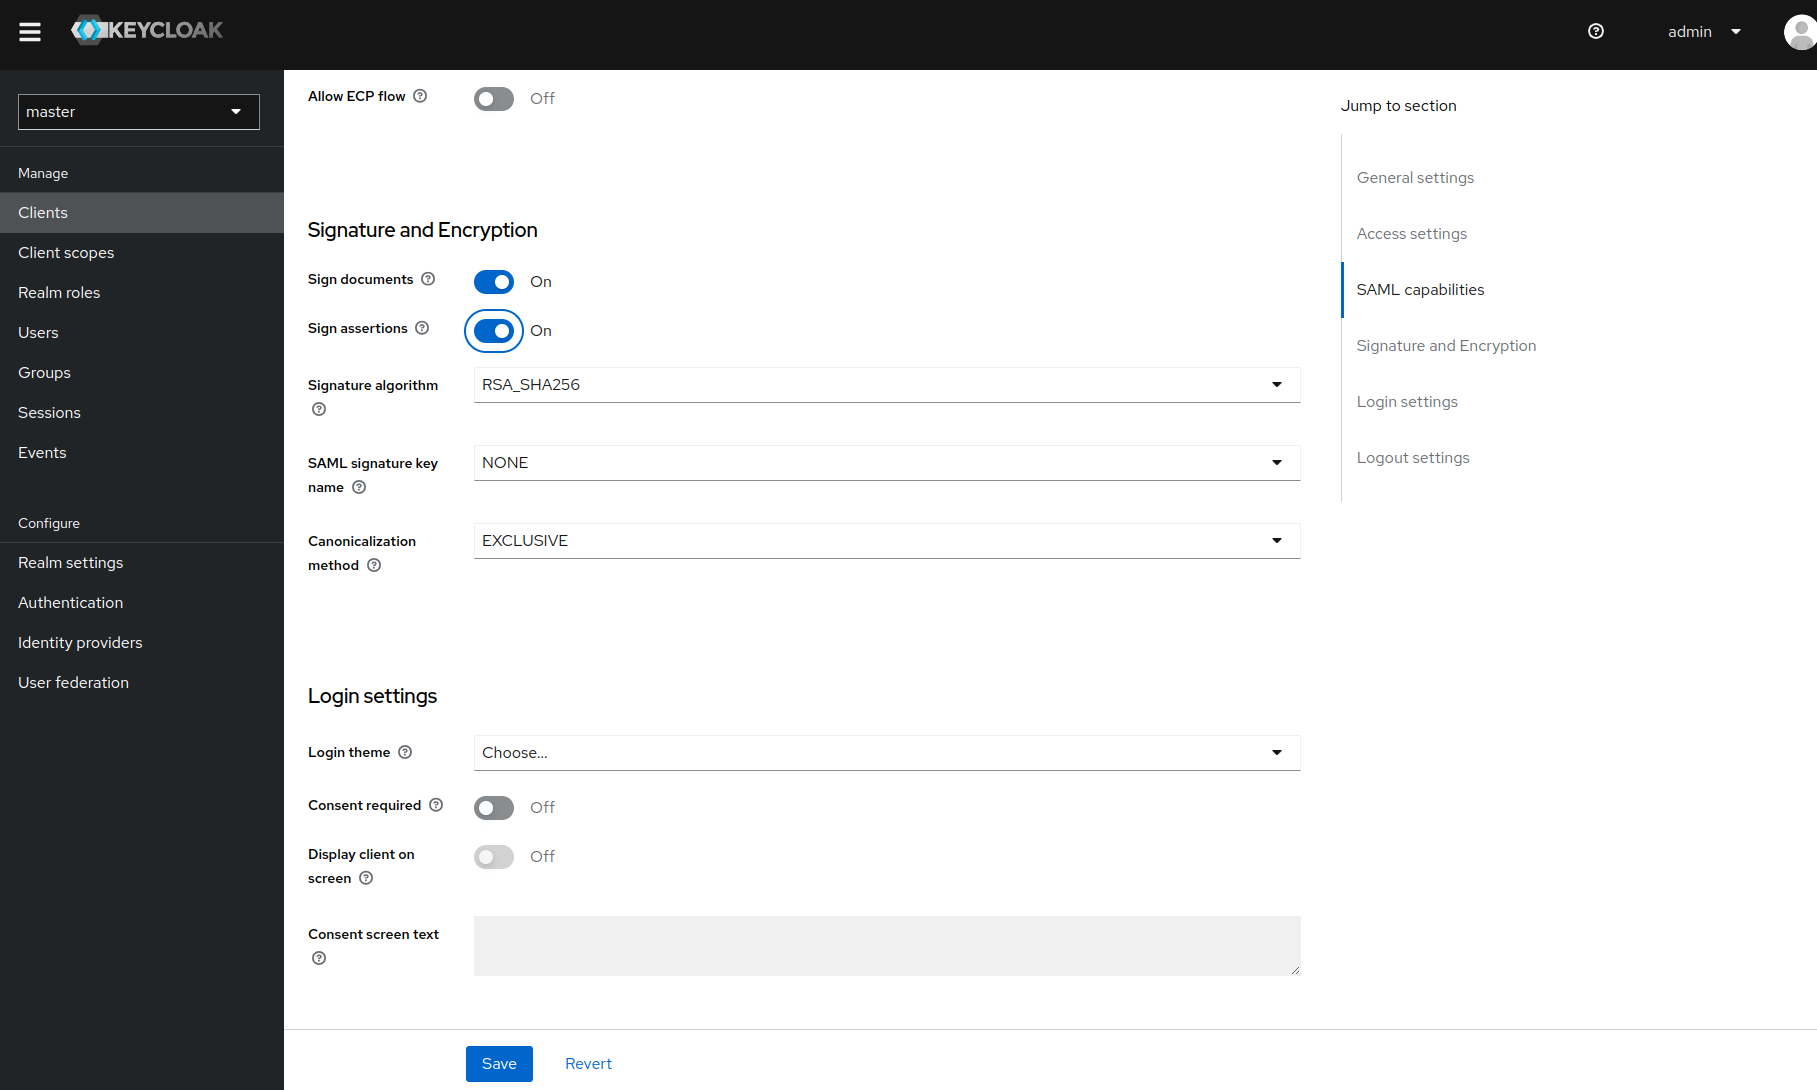
 3. Once the app is created, you MUST update theses parameters on client
settings:
* Sign Assertion: ON
3. Once the app is created, you MUST update theses parameters on client
settings:
* Sign Assertion: ON
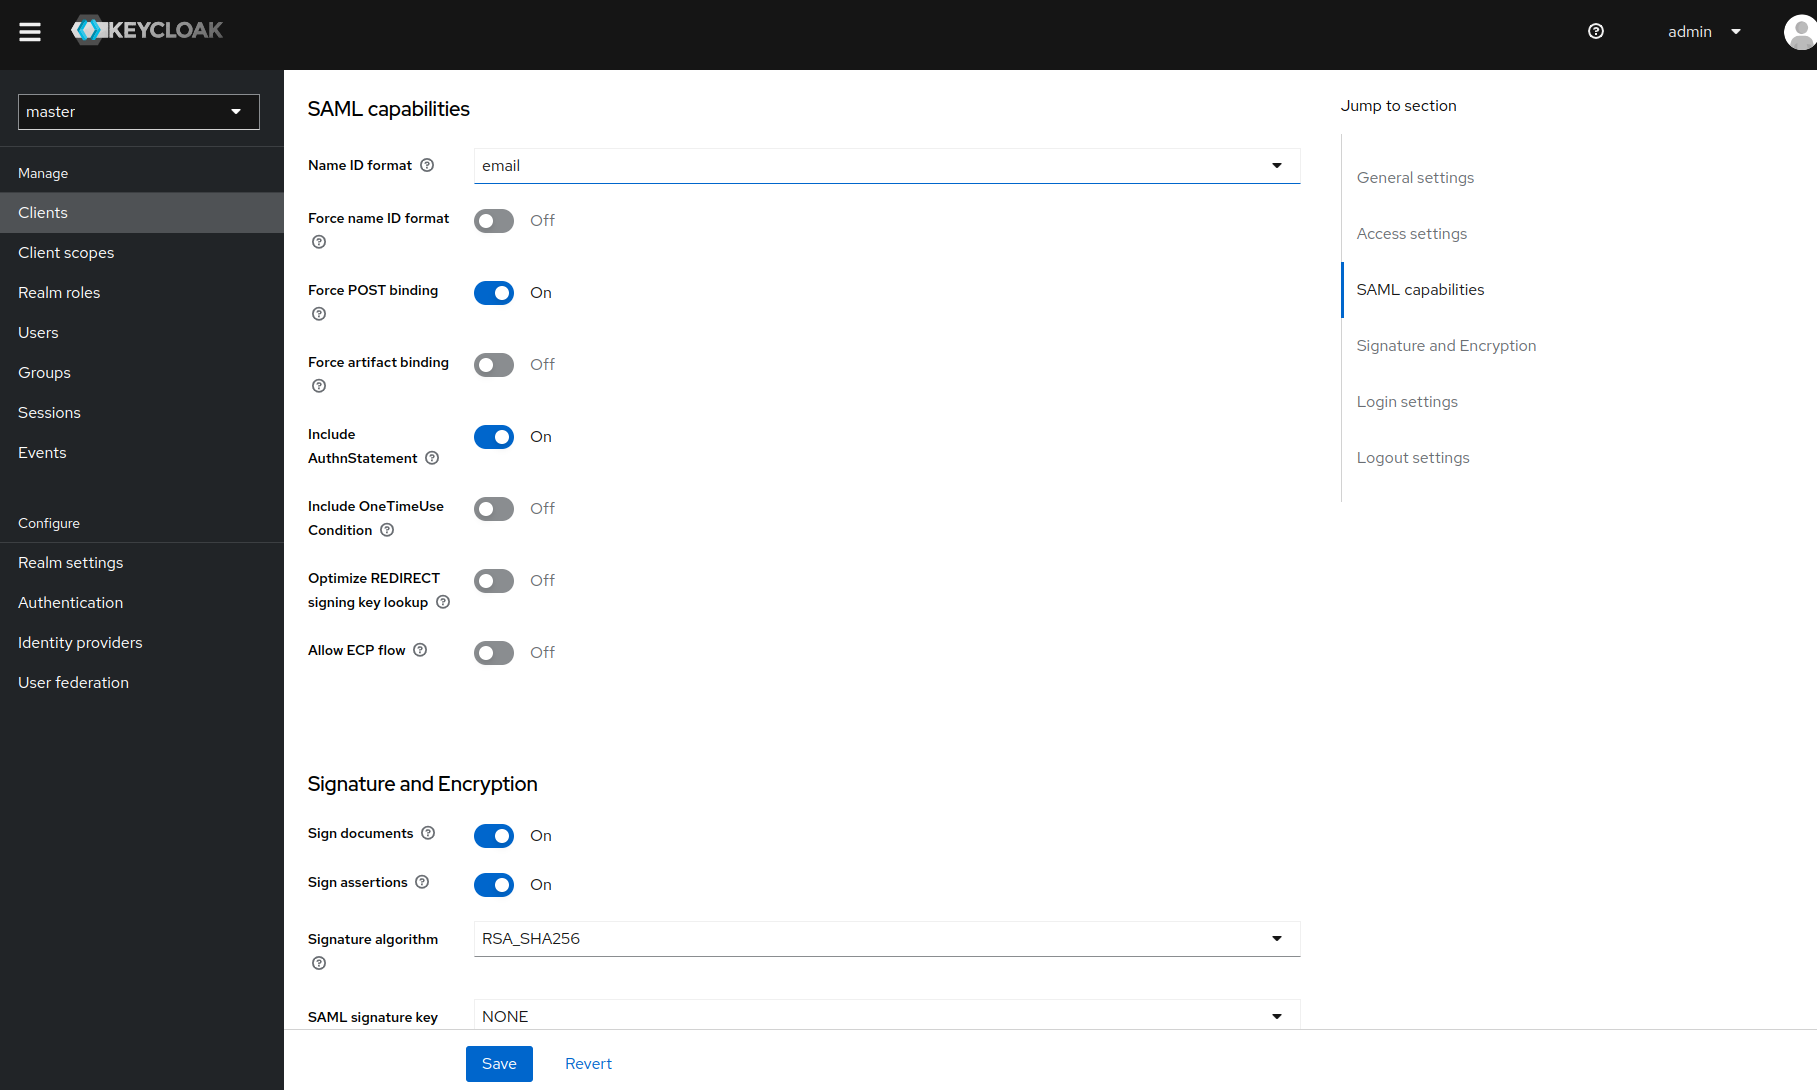
 * Name ID Format: Email
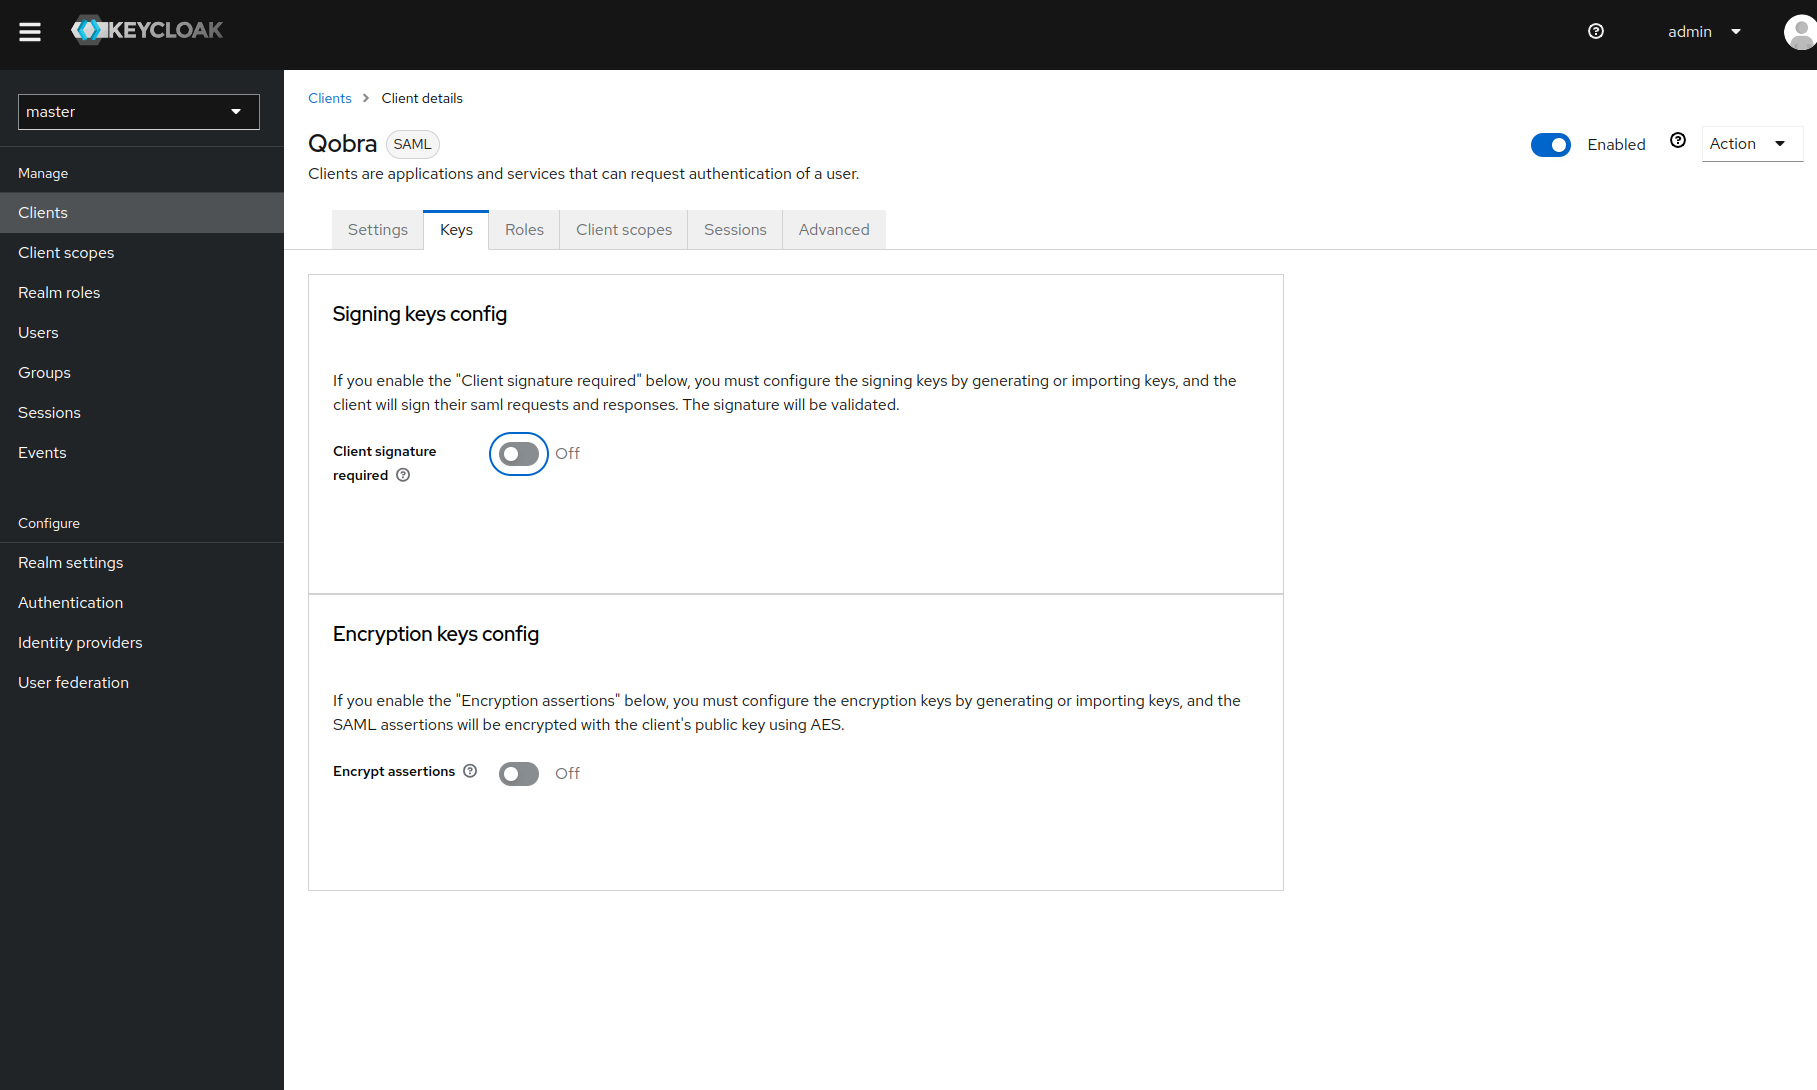
 * Signing key config: OFF
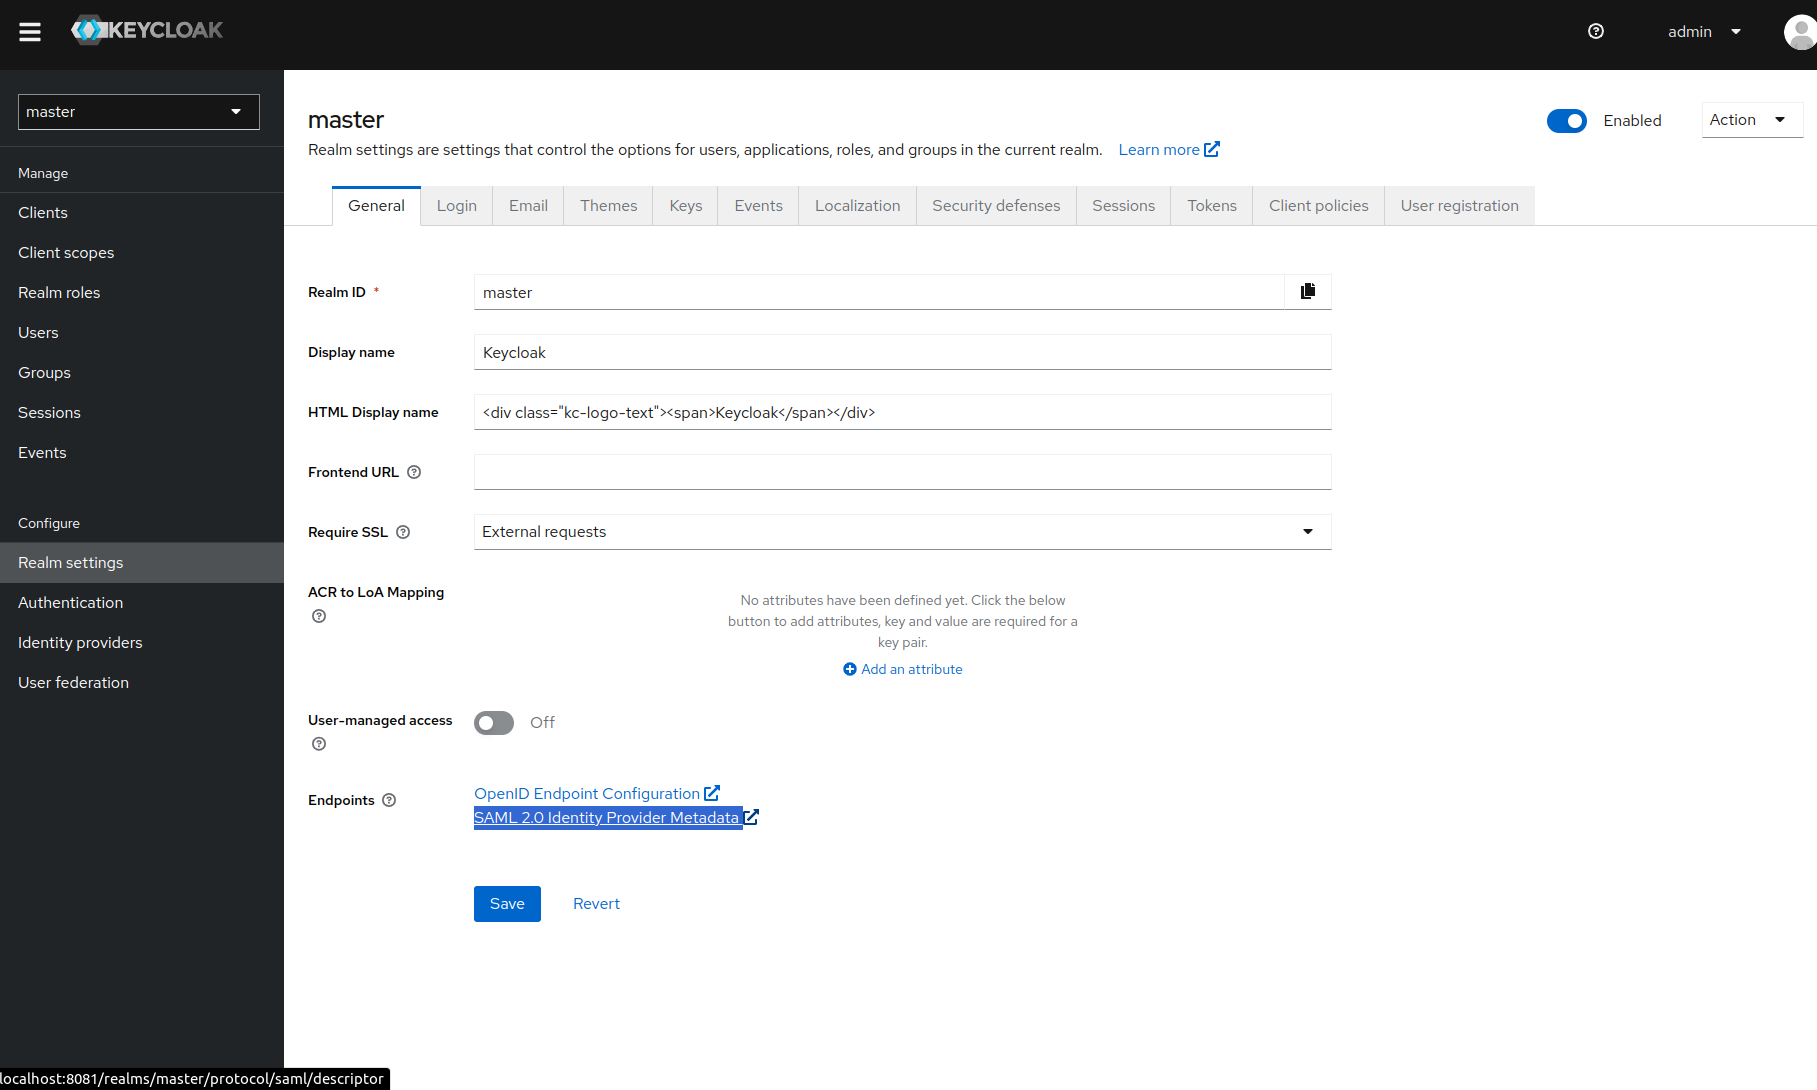
 4. Now you can access the metadata URL, as shown below
 ## Troubleshooting
### Can’t find the Metadata URL
* If you use Okta, KeyCloak or AzureDirectory, refer to the documentation
about those specific identity providers.
* If your identity provider only allow clients to download your metadata,
you’ll have to serve them through an URL (S3, cloud storage, static server,
etc …). Qobra does not allow the upload of SAML metadata in the platform.
### Metadata URL is rejected
The host of your Metadata URL may point to an internal destination. It
happened when you self-host your identity provider on your internal network.
As a security measure and because we cannot access this internal host,
we block the request. You must serve your metadata through a public URL.
### Can’t authenticate after registering your SSO
Check your Metadata URL by visiting it directly on your browser:
* The page should not return an error
* The page should return an XML file
* The assertions should be signed in your XML file
### Issues with setting home realm discovery
As a security measure, an admin is only able to set a home realm discovery
matching the domain name of his email address. To change it to another client
domain, you should ask the support for help.
## Troubleshooting
### Can’t find the Metadata URL
* If you use Okta, KeyCloak or AzureDirectory, refer to the documentation
about those specific identity providers.
* If your identity provider only allow clients to download your metadata,
you’ll have to serve them through an URL (S3, cloud storage, static server,
etc …). Qobra does not allow the upload of SAML metadata in the platform.
### Metadata URL is rejected
The host of your Metadata URL may point to an internal destination. It
happened when you self-host your identity provider on your internal network.
As a security measure and because we cannot access this internal host,
we block the request. You must serve your metadata through a public URL.
### Can’t authenticate after registering your SSO
Check your Metadata URL by visiting it directly on your browser:
* The page should not return an error
* The page should return an XML file
* The assertions should be signed in your XML file
### Issues with setting home realm discovery
As a security measure, an admin is only able to set a home realm discovery
matching the domain name of his email address. To change it to another client
domain, you should ask the support for help.